BrewPi released! All source code online, a wiki, a forum, a bug tracker.. Let’s go!
I have been working really hard towards this day and I am proud to announce that as of today BrewPi is fully open source! Sorry to have kept you waiting for so long, but it just takes so much more time when you are building something that anyone should be able to use compared to hacking something together for yourself.
BrewPi is an open source fermentation controller that runs on an Arduino (for now) and a Raspberry Pi. It can control your beer temperature with 0.1 degree precision, log temperature data in nice graphs and is fully configurable from a web interface.
If you are not into brewing, but do like to thinker with electronics, give the article a read. I had to invent many little things that could be very helpful for other projects too. I can think of a lot of cool things you could that involve controlling an Arduino from a web browser.
To give you an idea of the features, here’s a slide show:
-
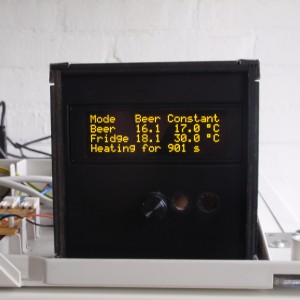
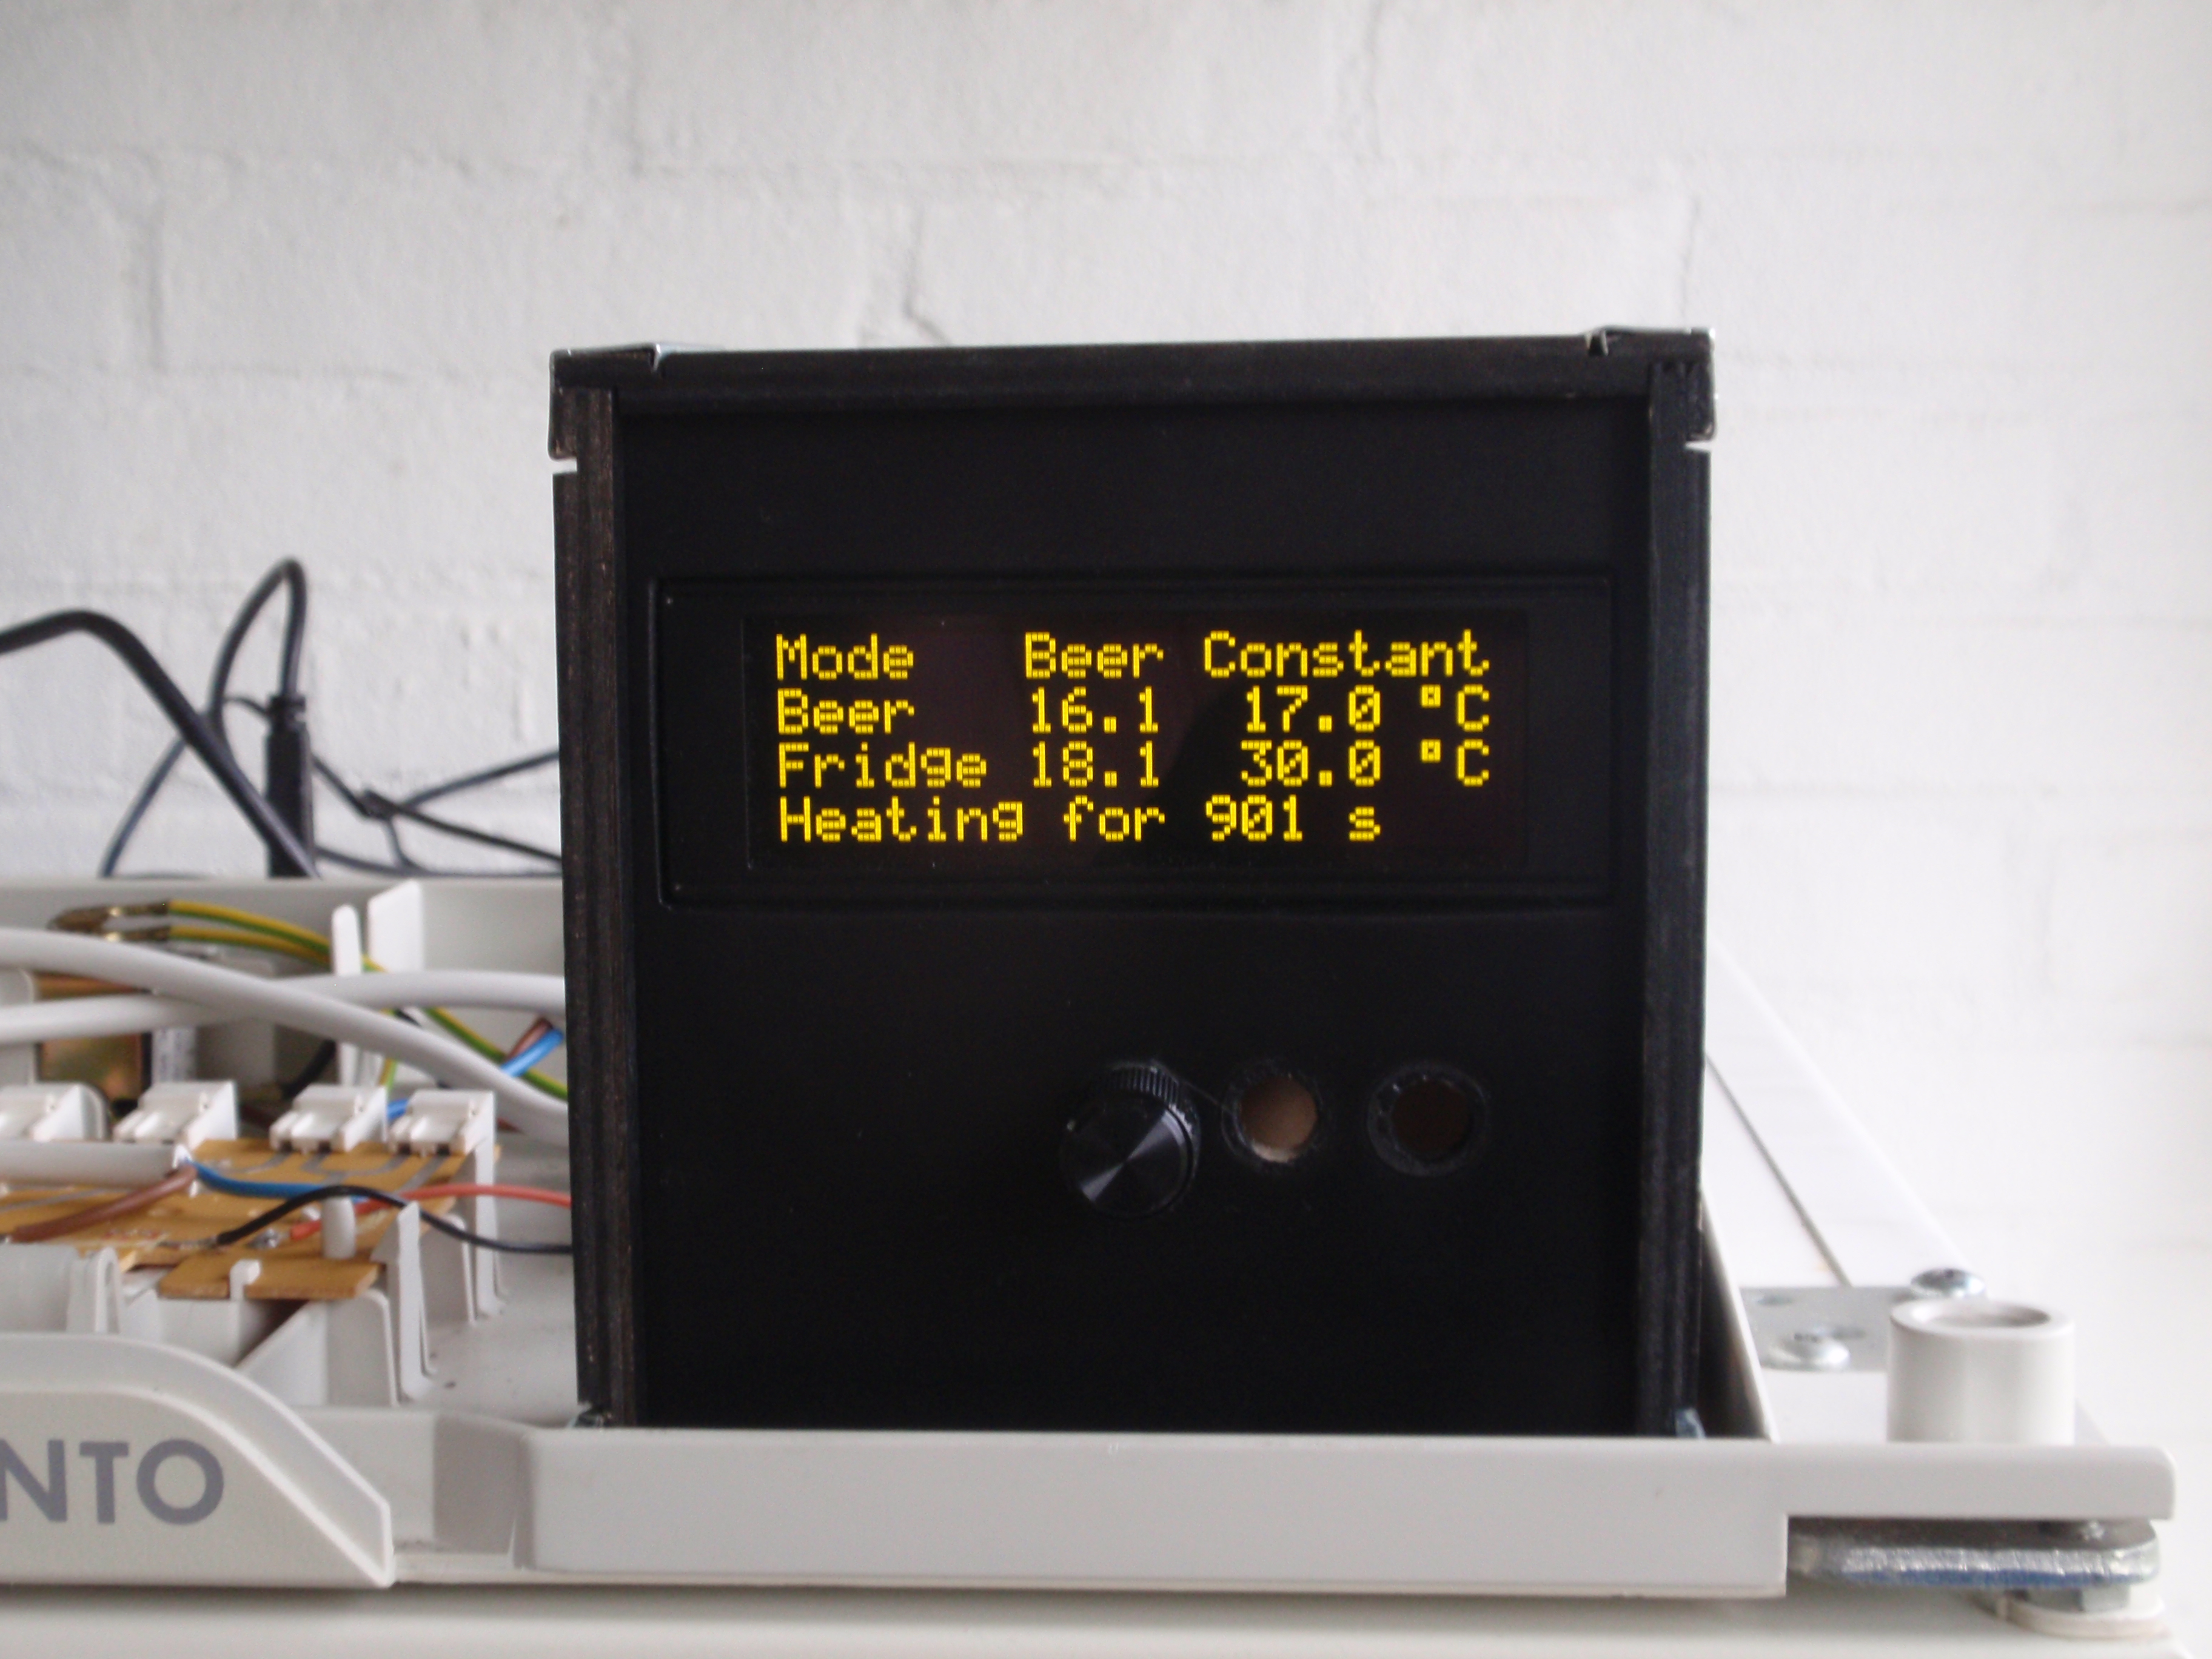
- My BrewPi has a nice 4×20 character OLED display. Very bright and clear. The settings can be changed on the fridge itself with a rotary encoder with push button
-
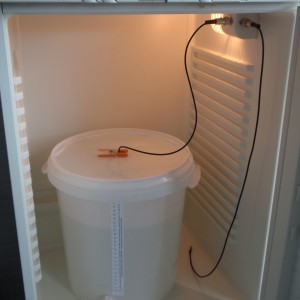
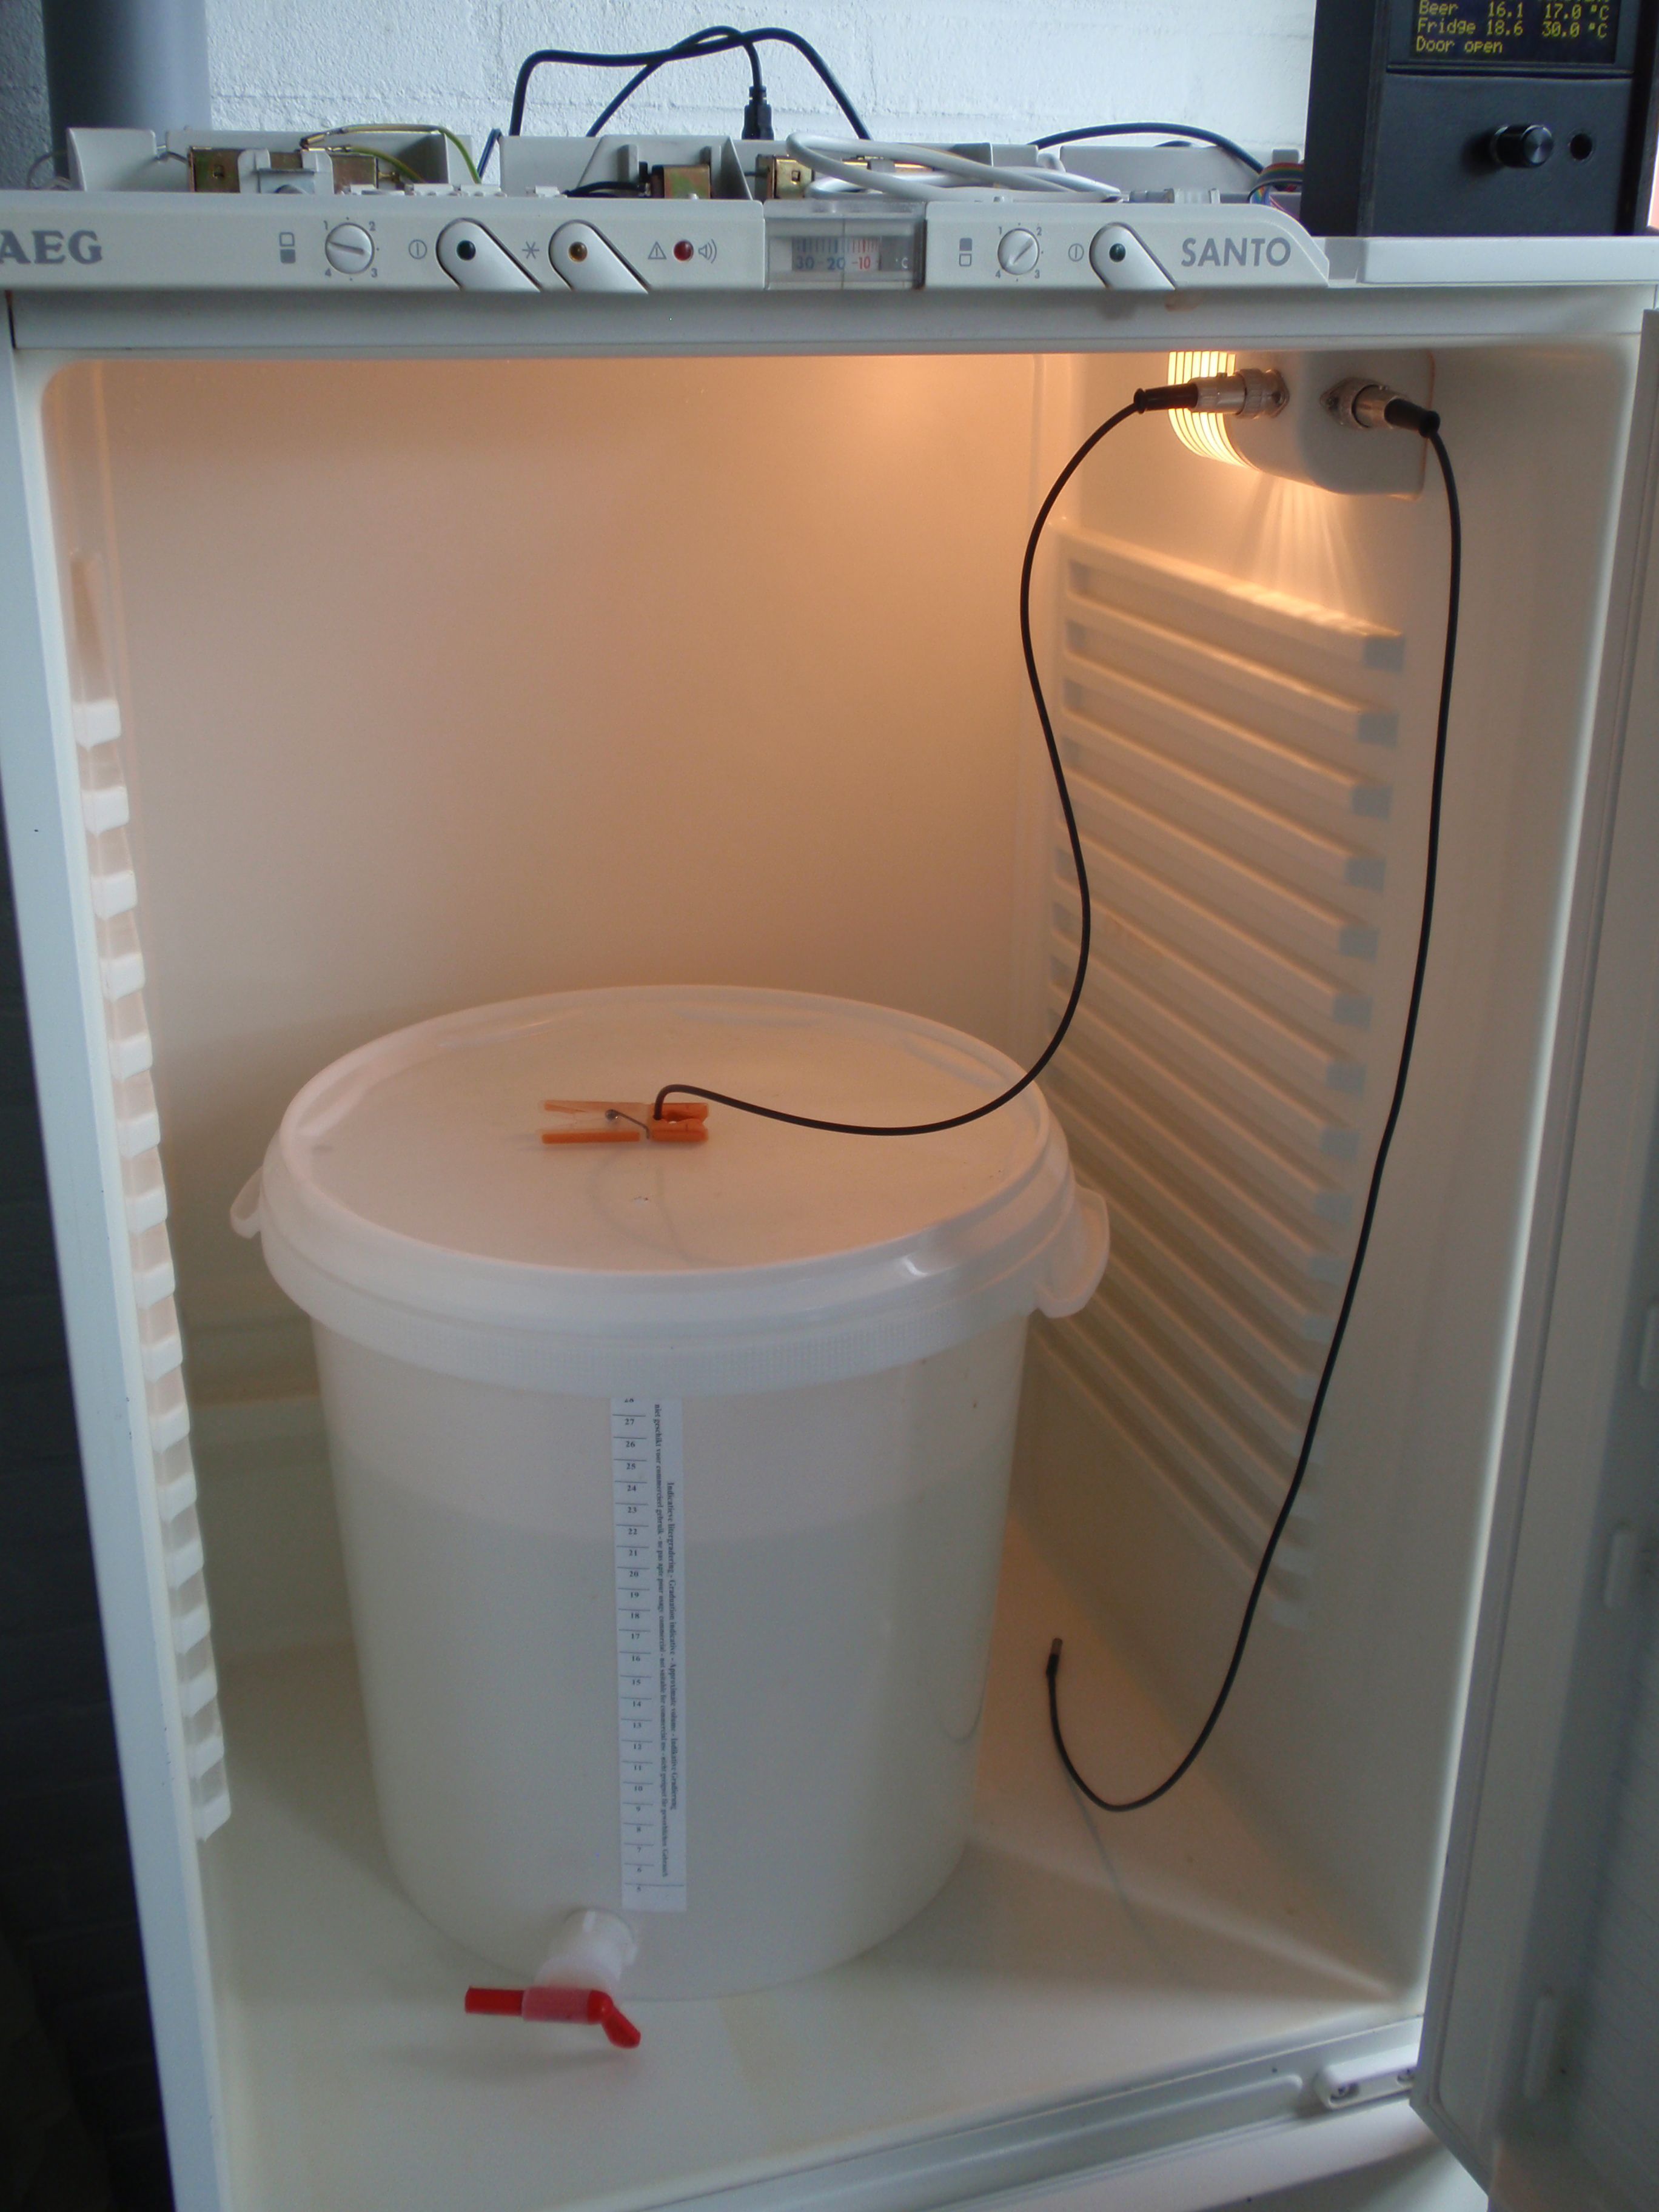
- My fermenter inside BrewPi for a test with water. The DS18B20 sensors are watertight and connected with DIN plugs. I still have to make the sensor hole air-tight before starting a real brew.
-
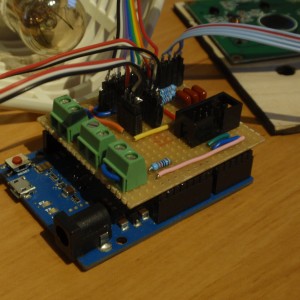
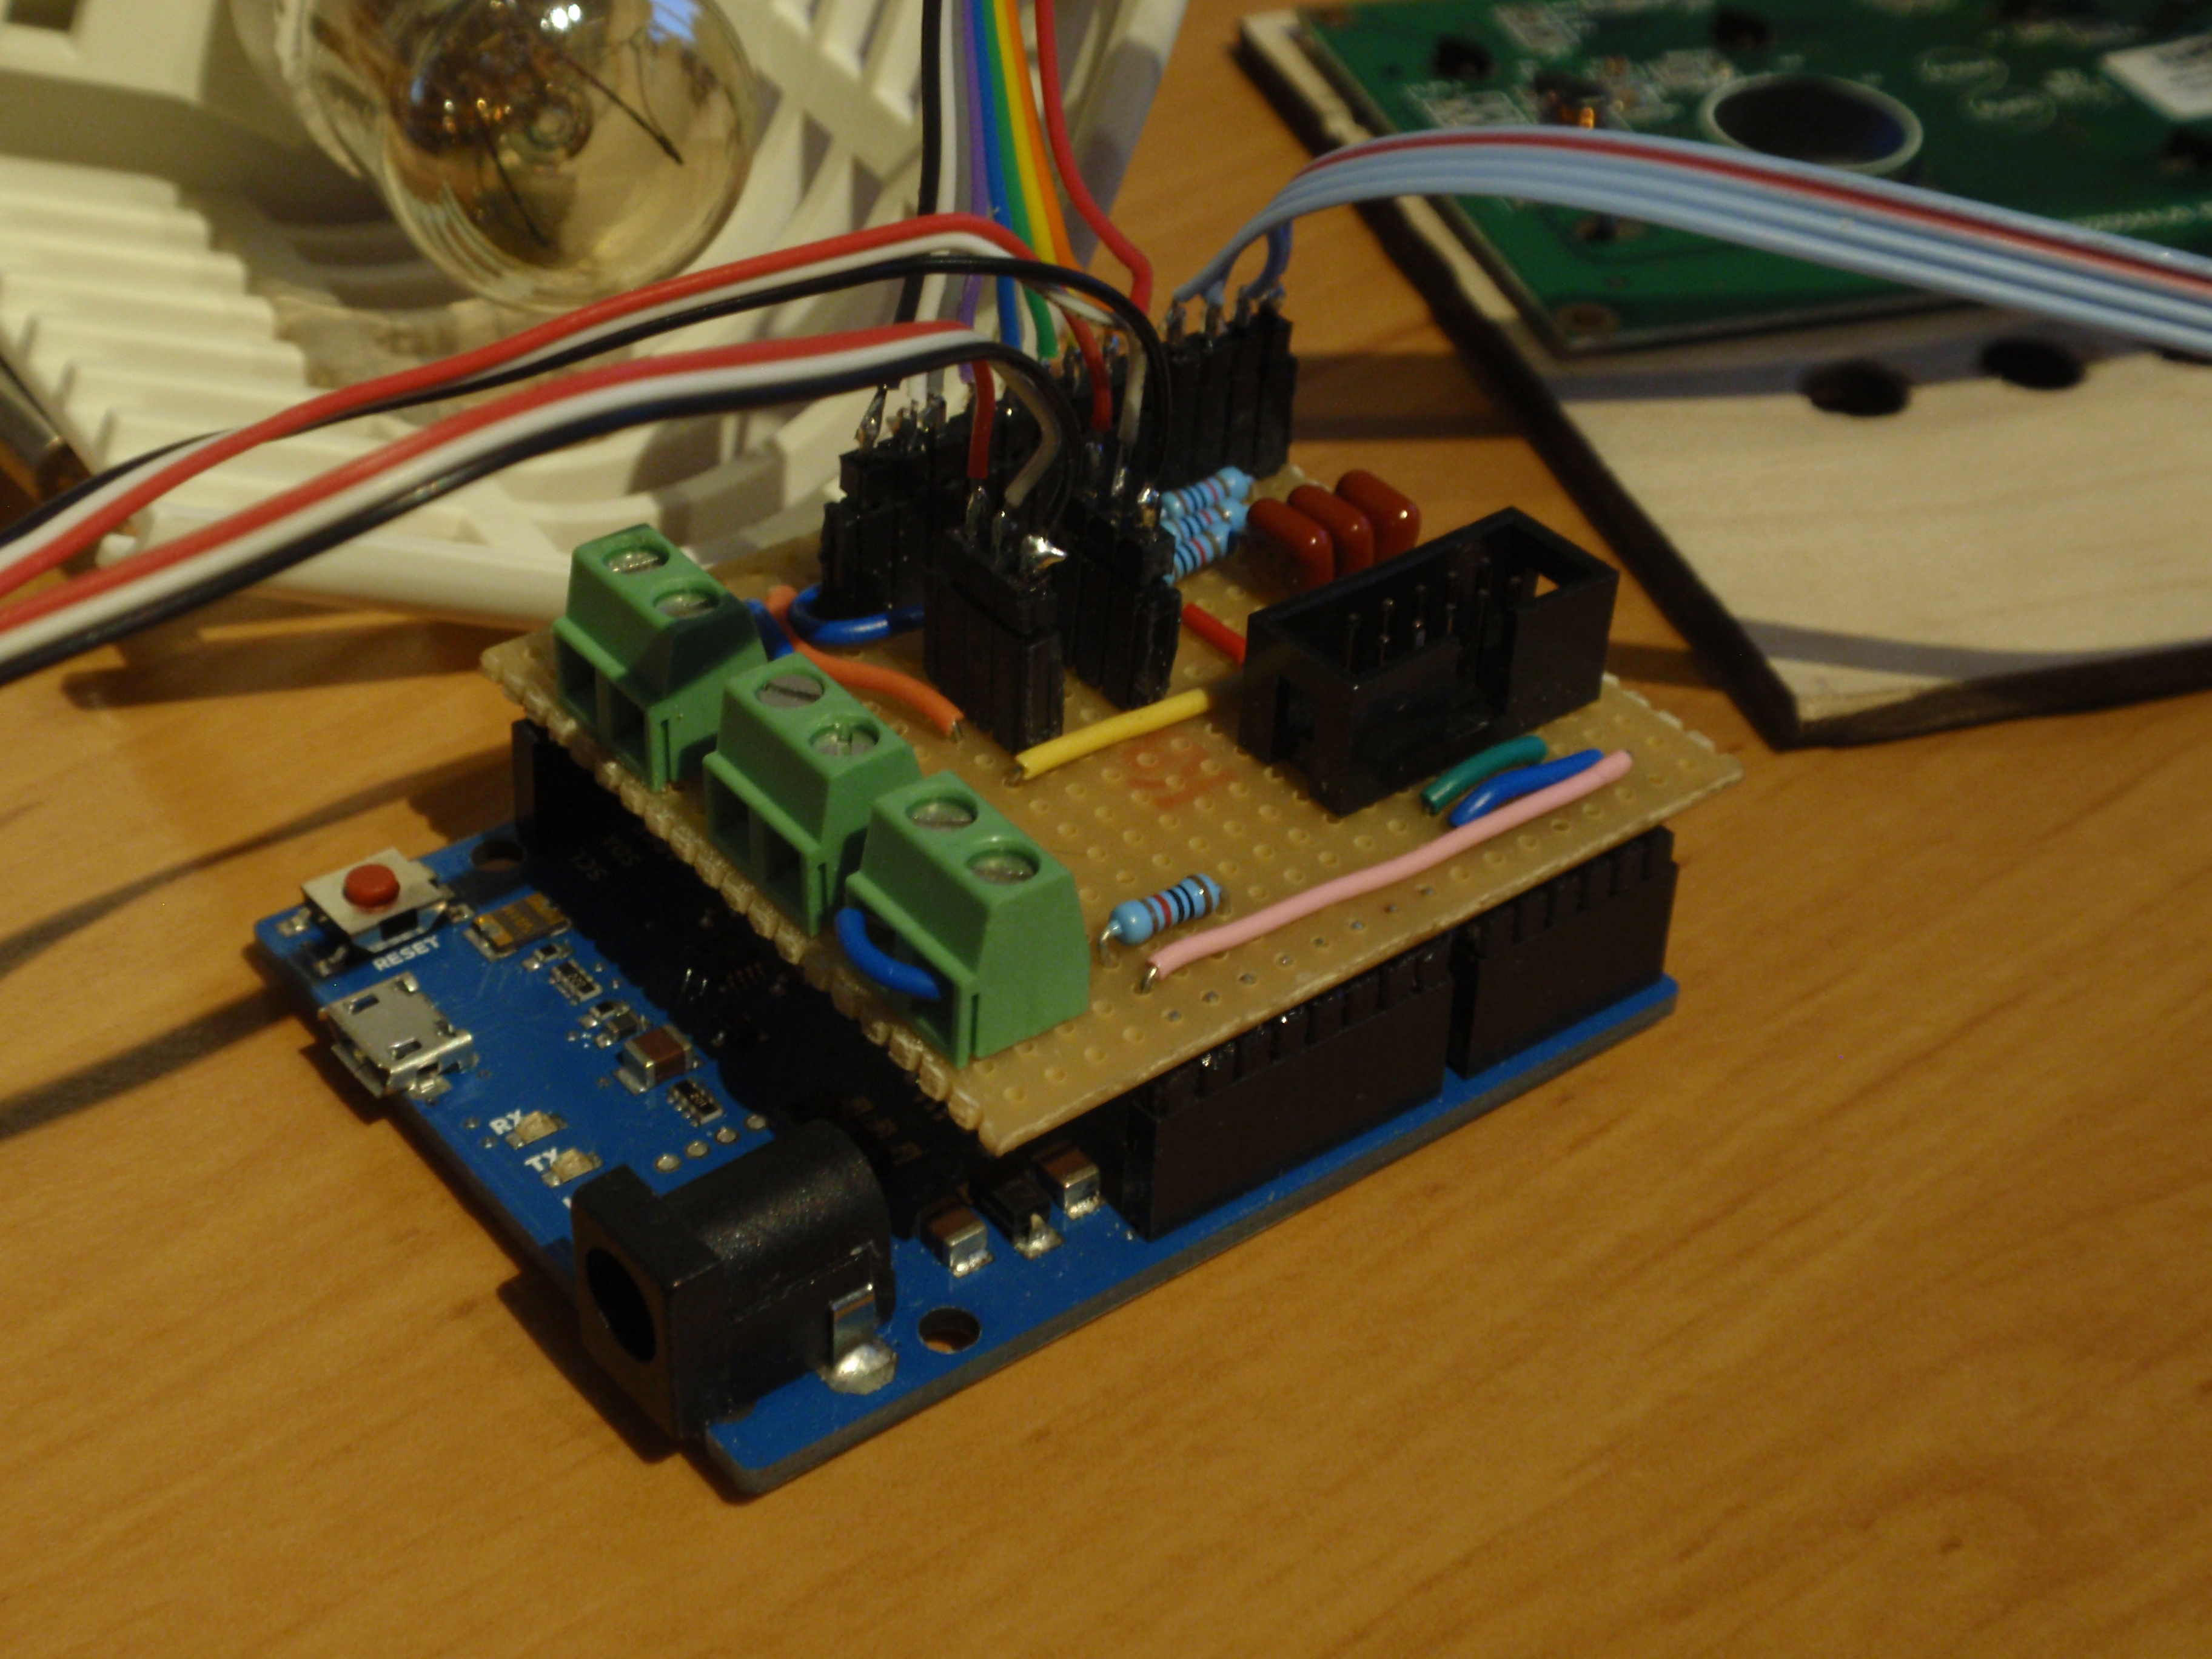
- My DIY BrewPi Arduino shield sitting on my Arduino Leonardo
-
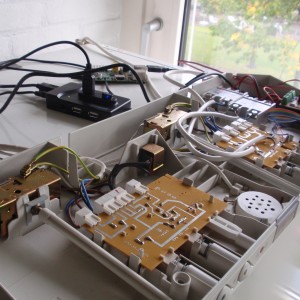
- Top view of my fridge. It’s a great fridge to hack, because all circuits are accessible from the top.
-
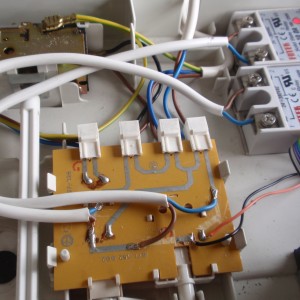
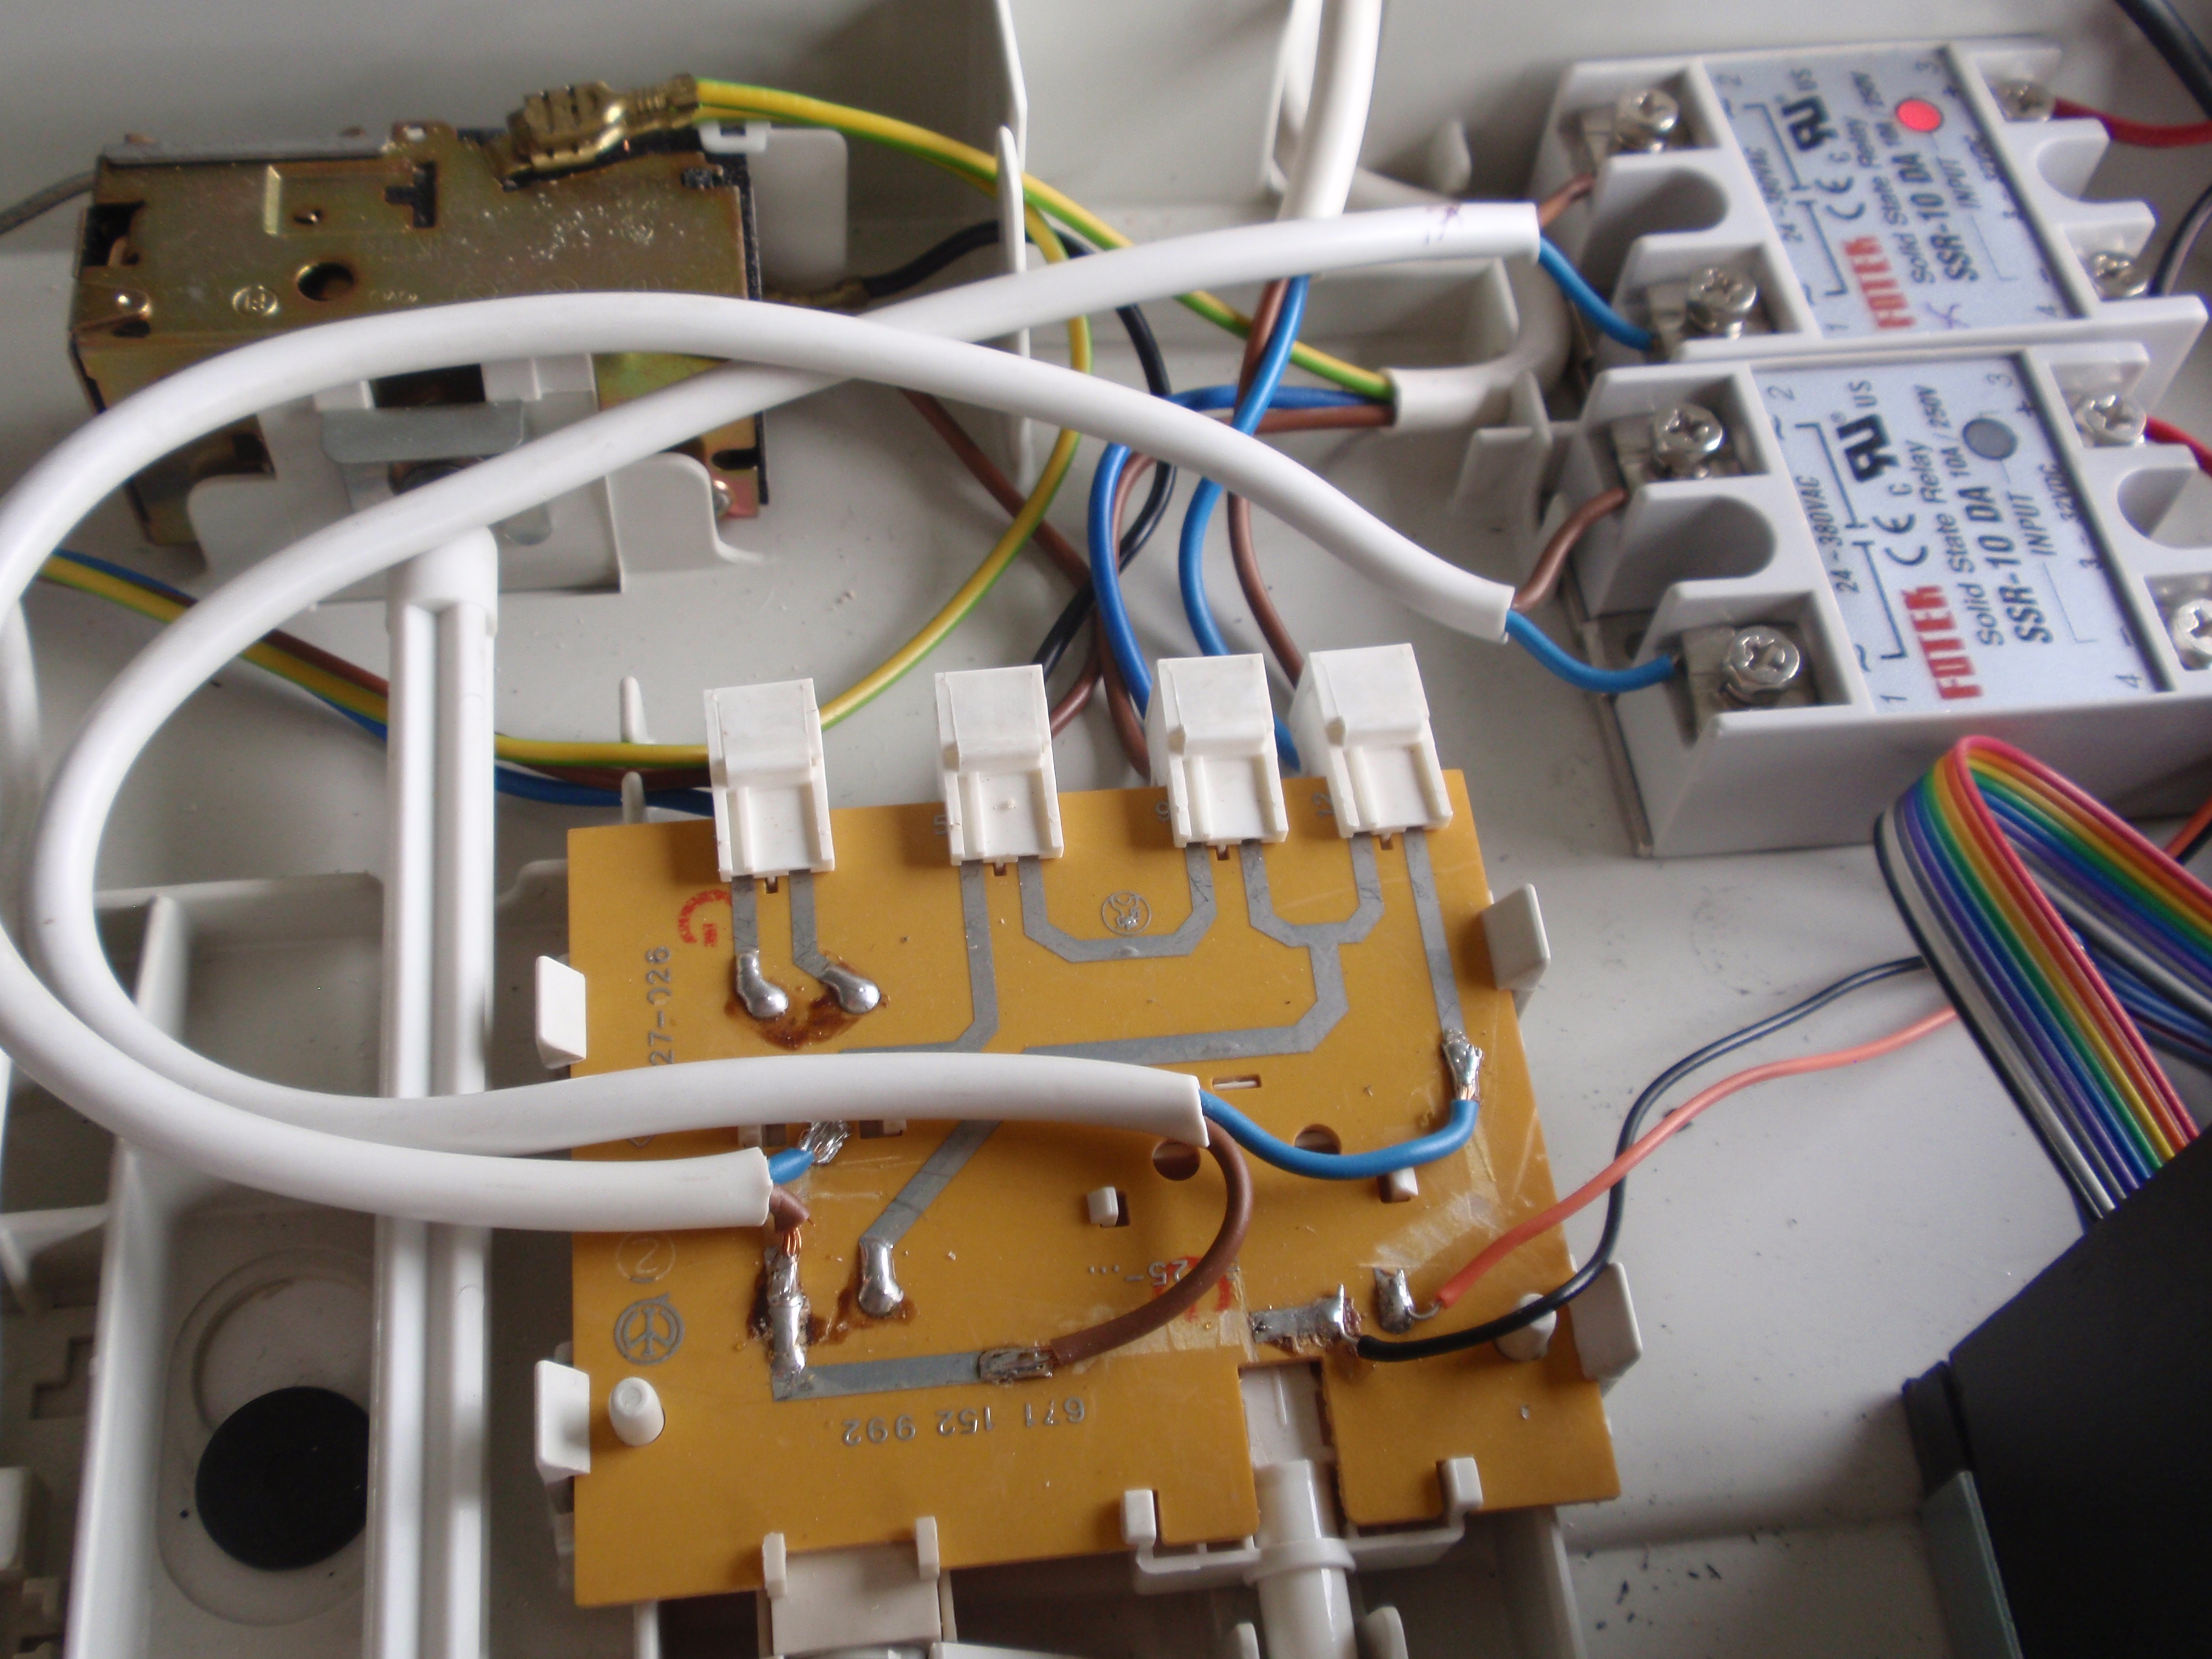
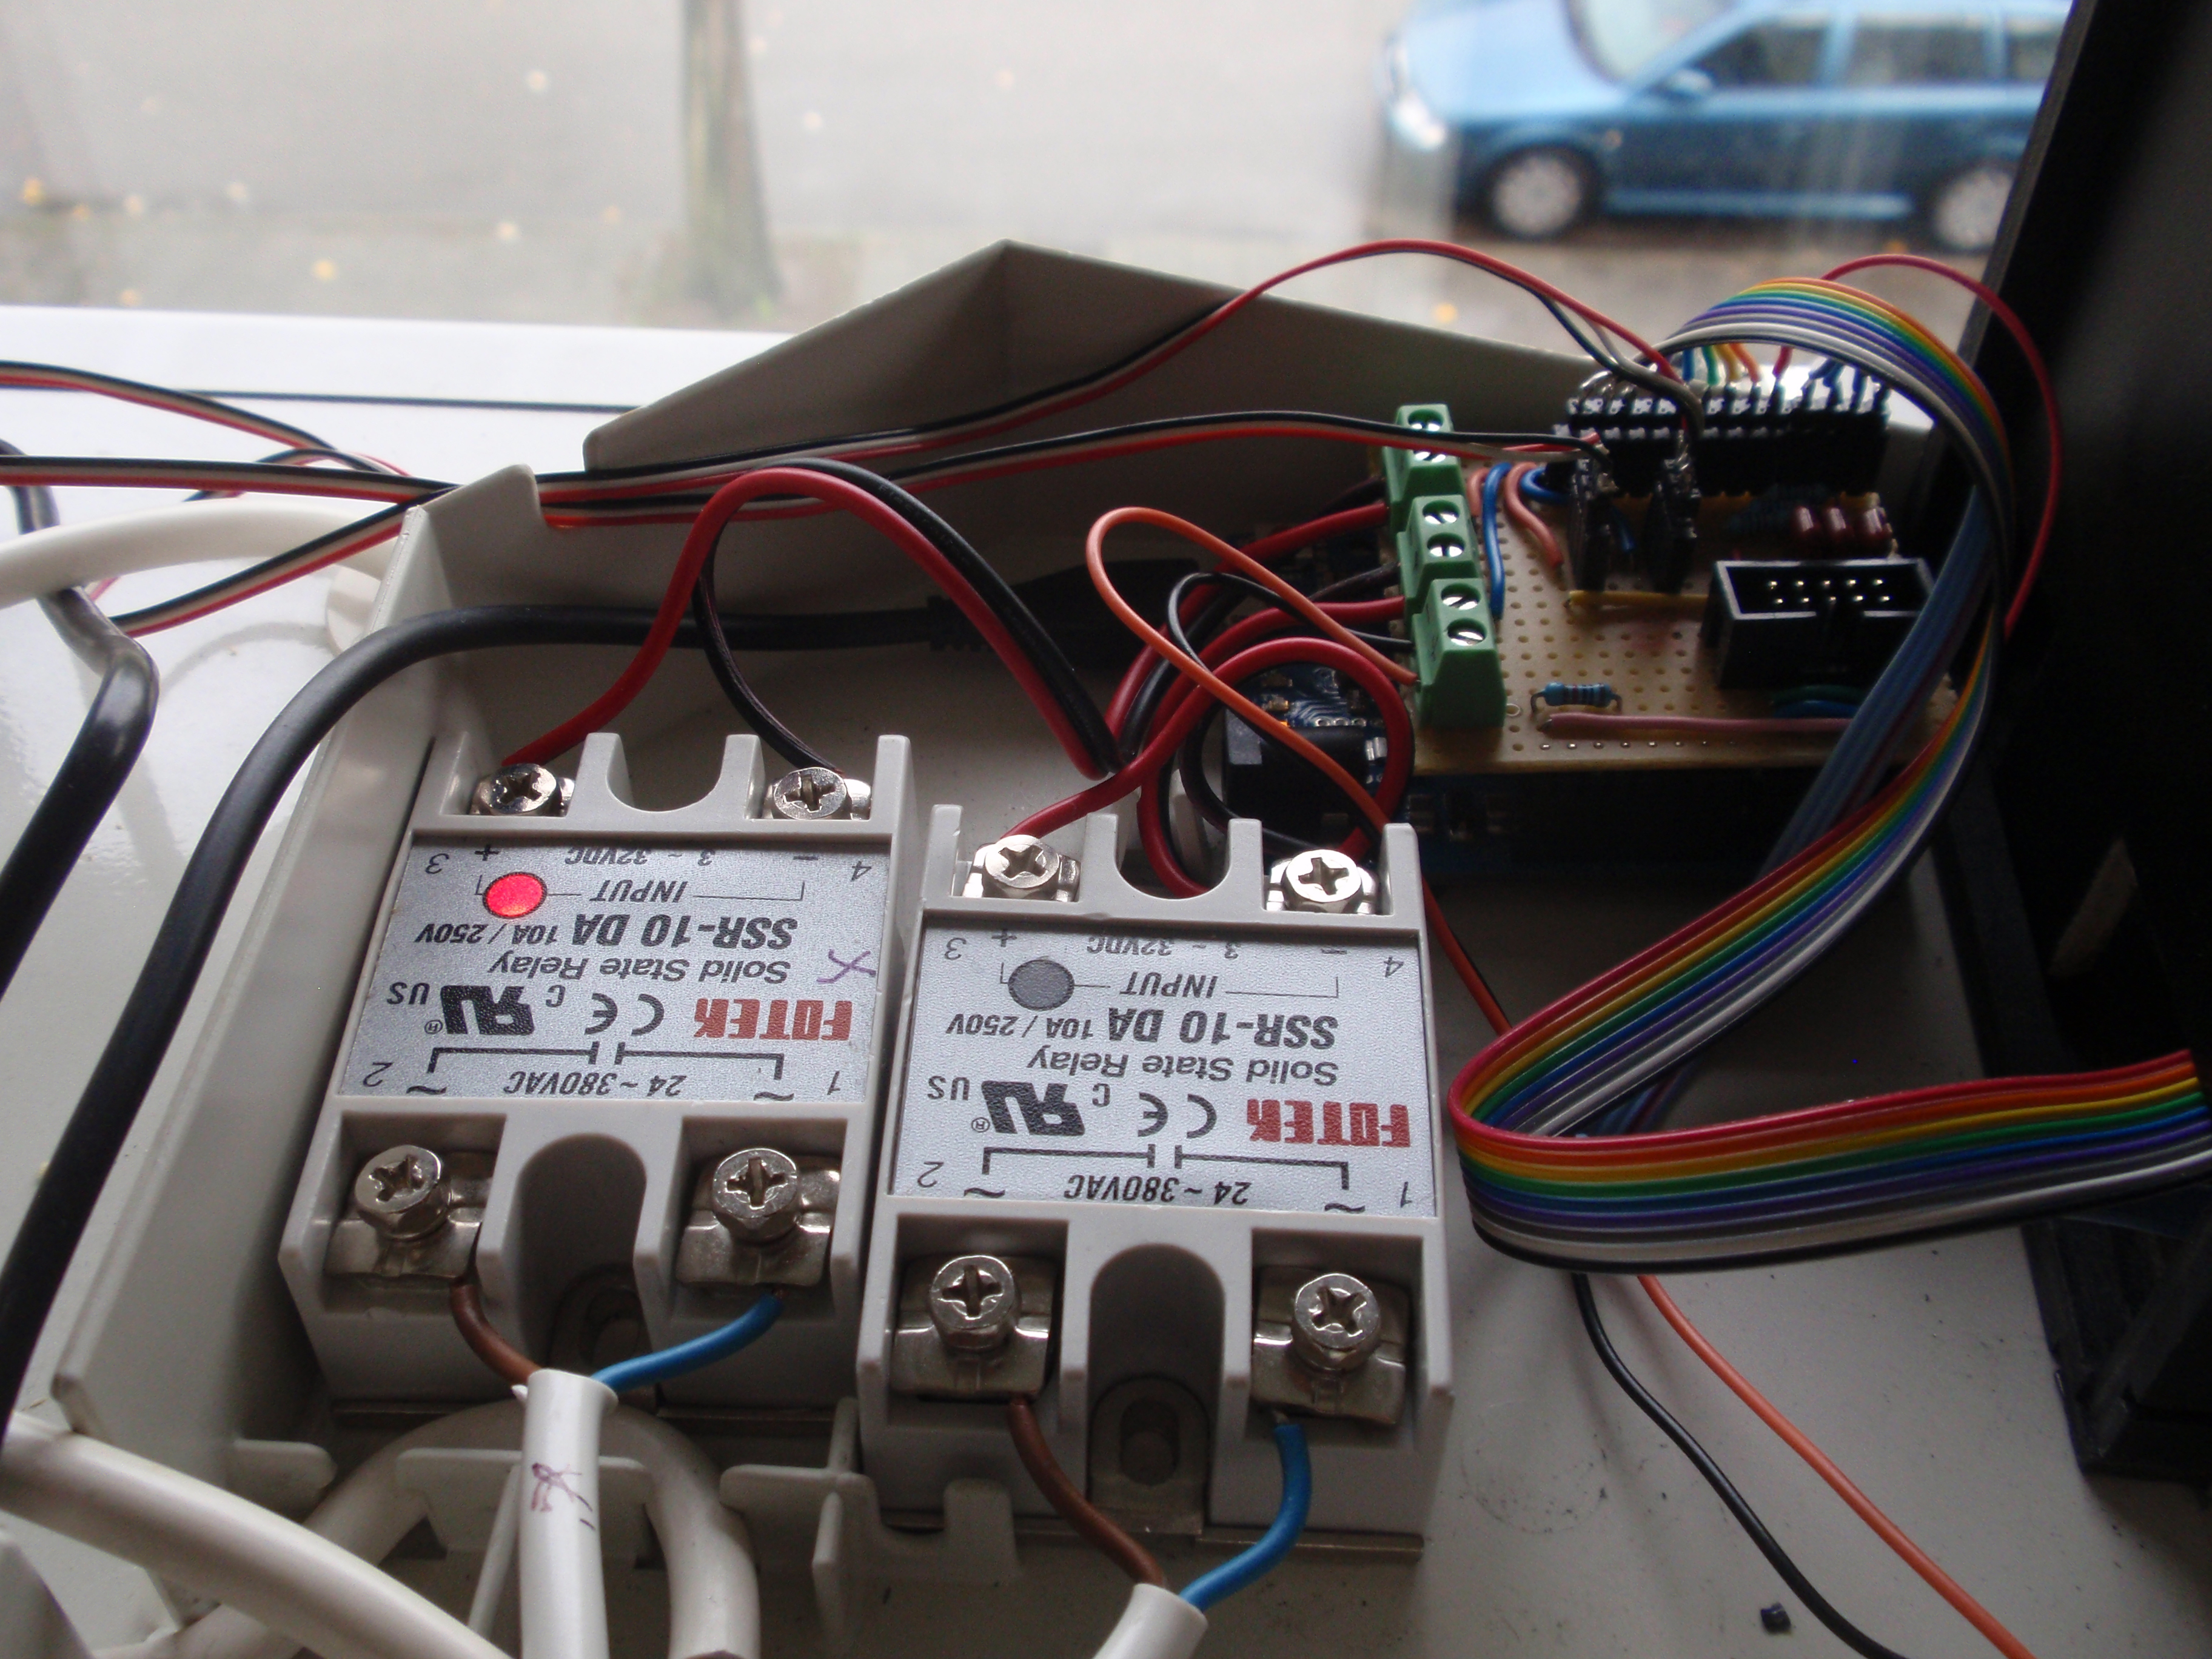
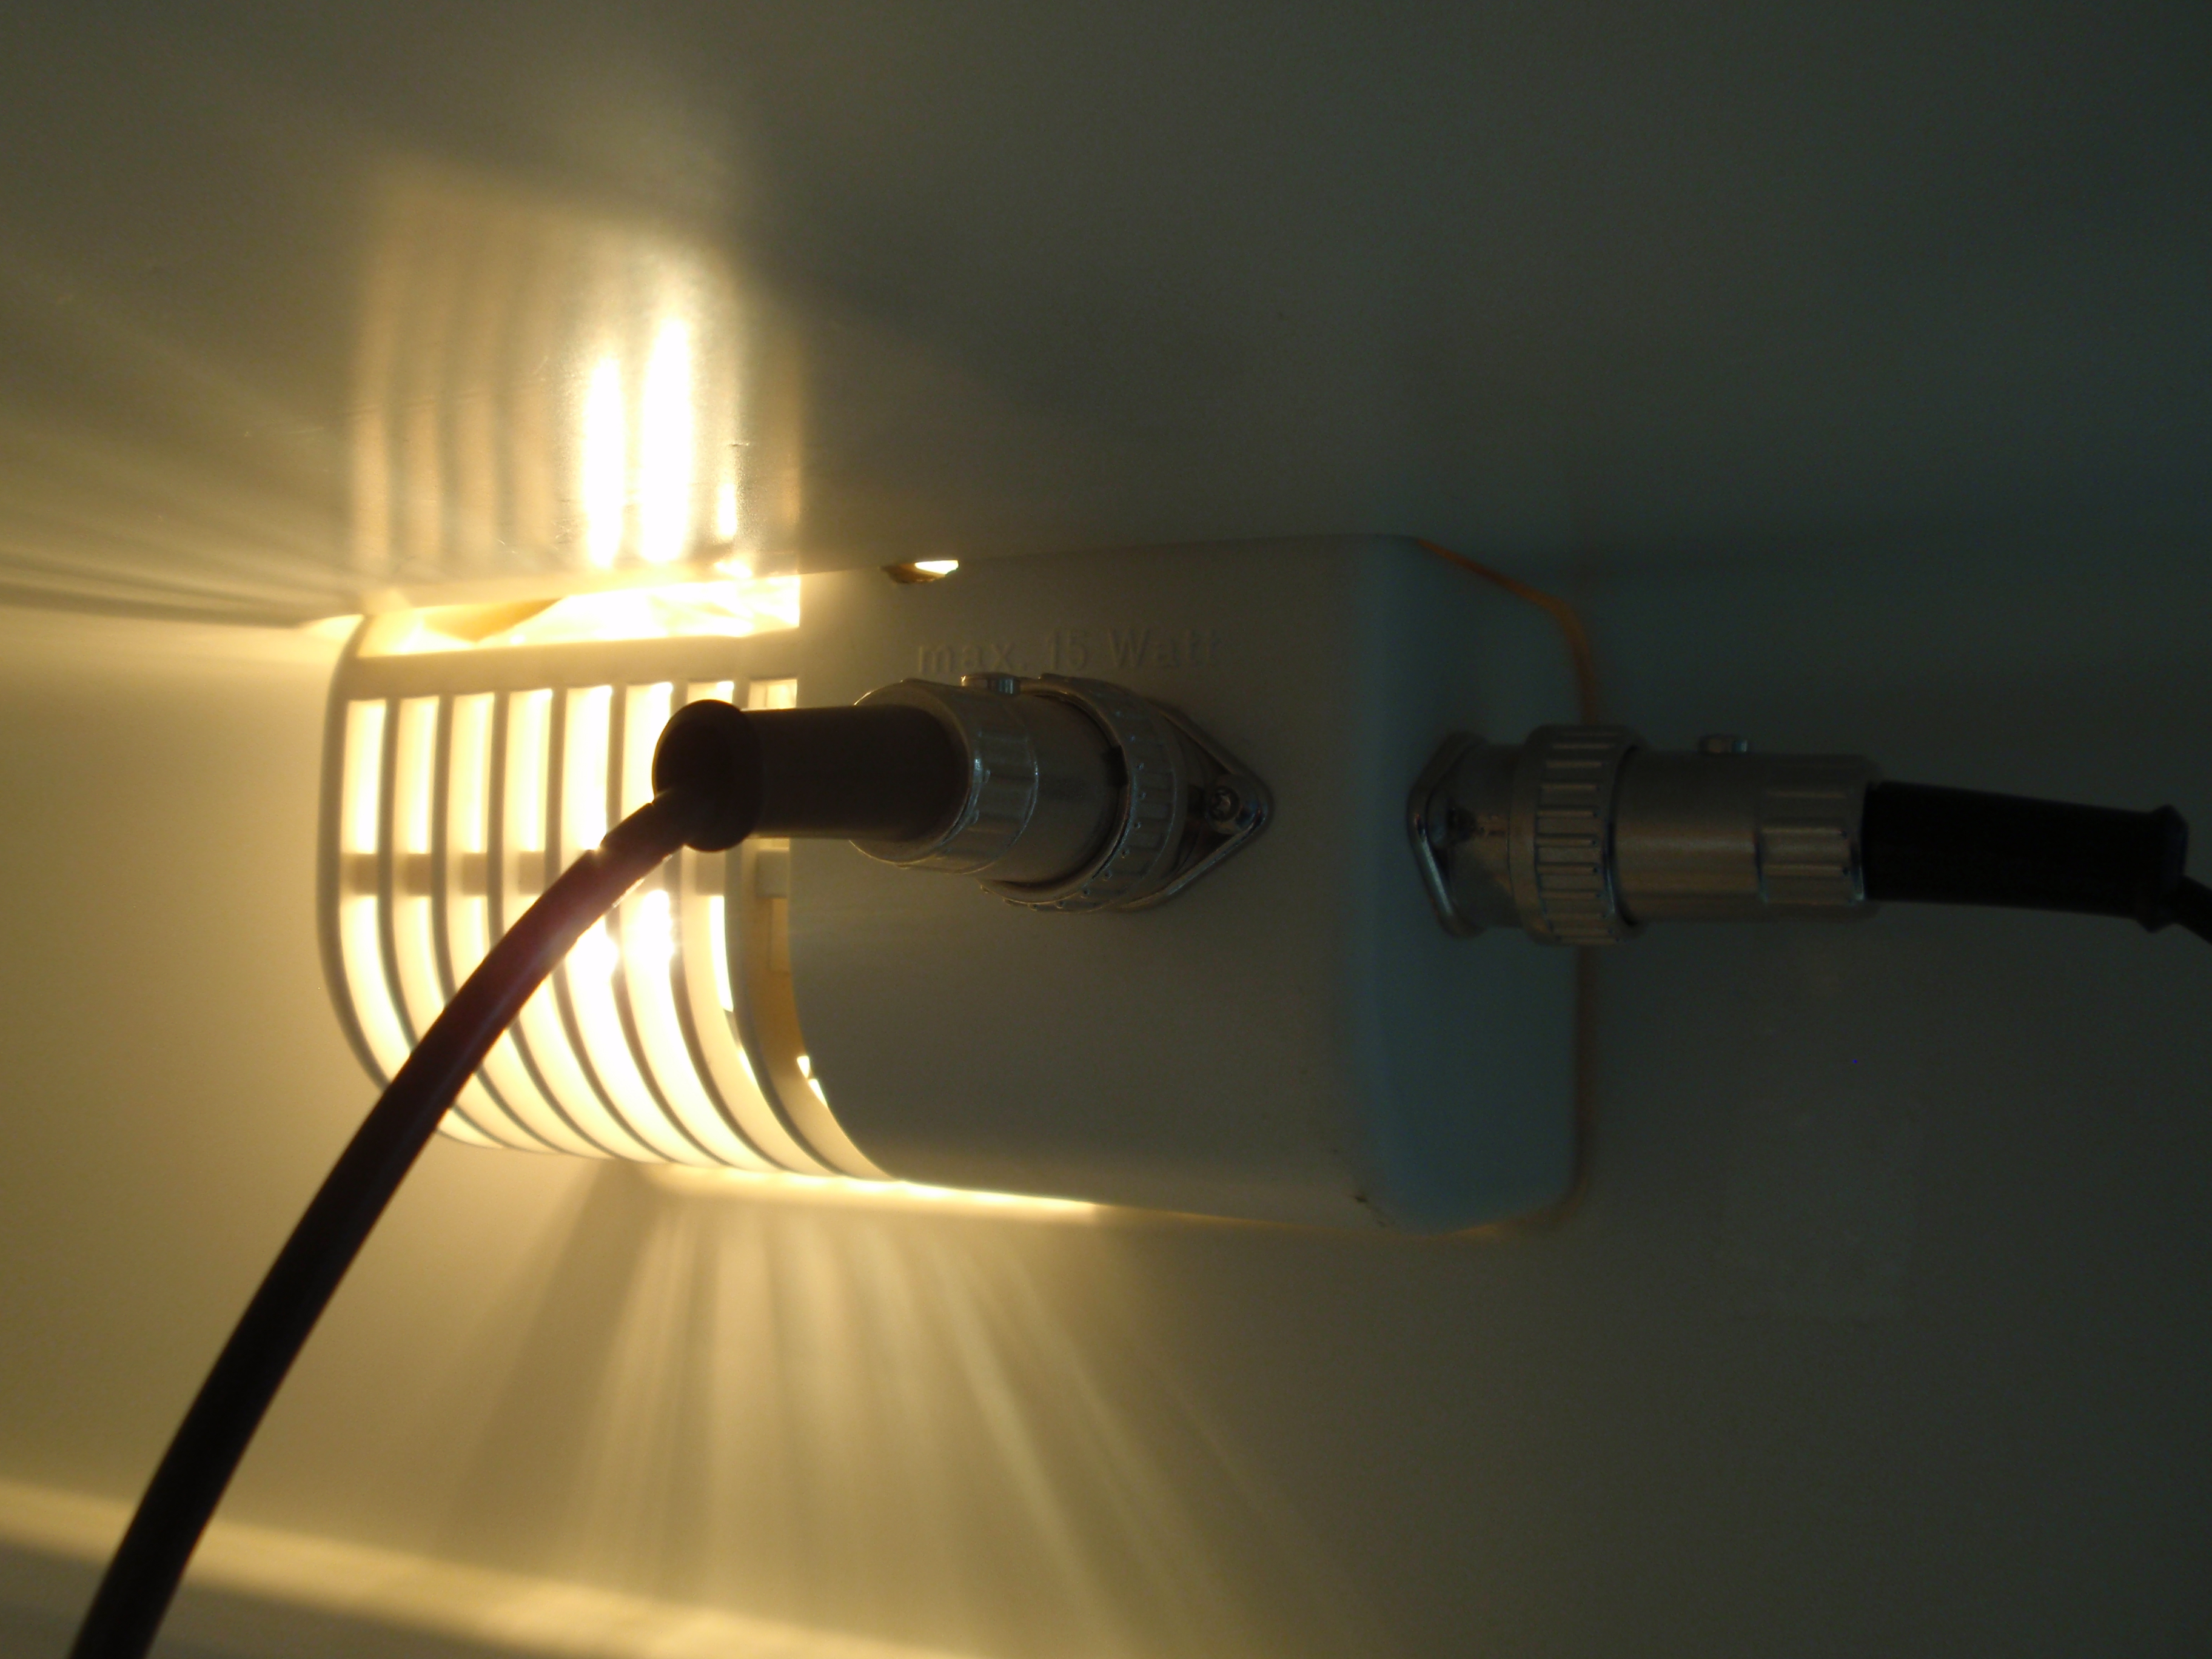
- I cut the traces for the compressor and the light bulb and rerouted them through two solid state relays. These relays are controlled by an Arduino. The compressor is for cooling. The light bulb for heating and, well, light.
-
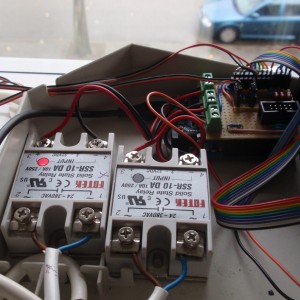
- Very happy with these solid state relays too! The built-in LED is very useful for testing.
-
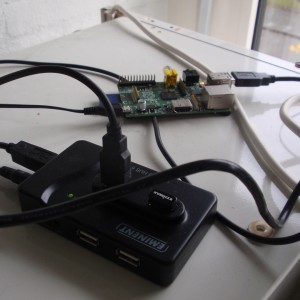
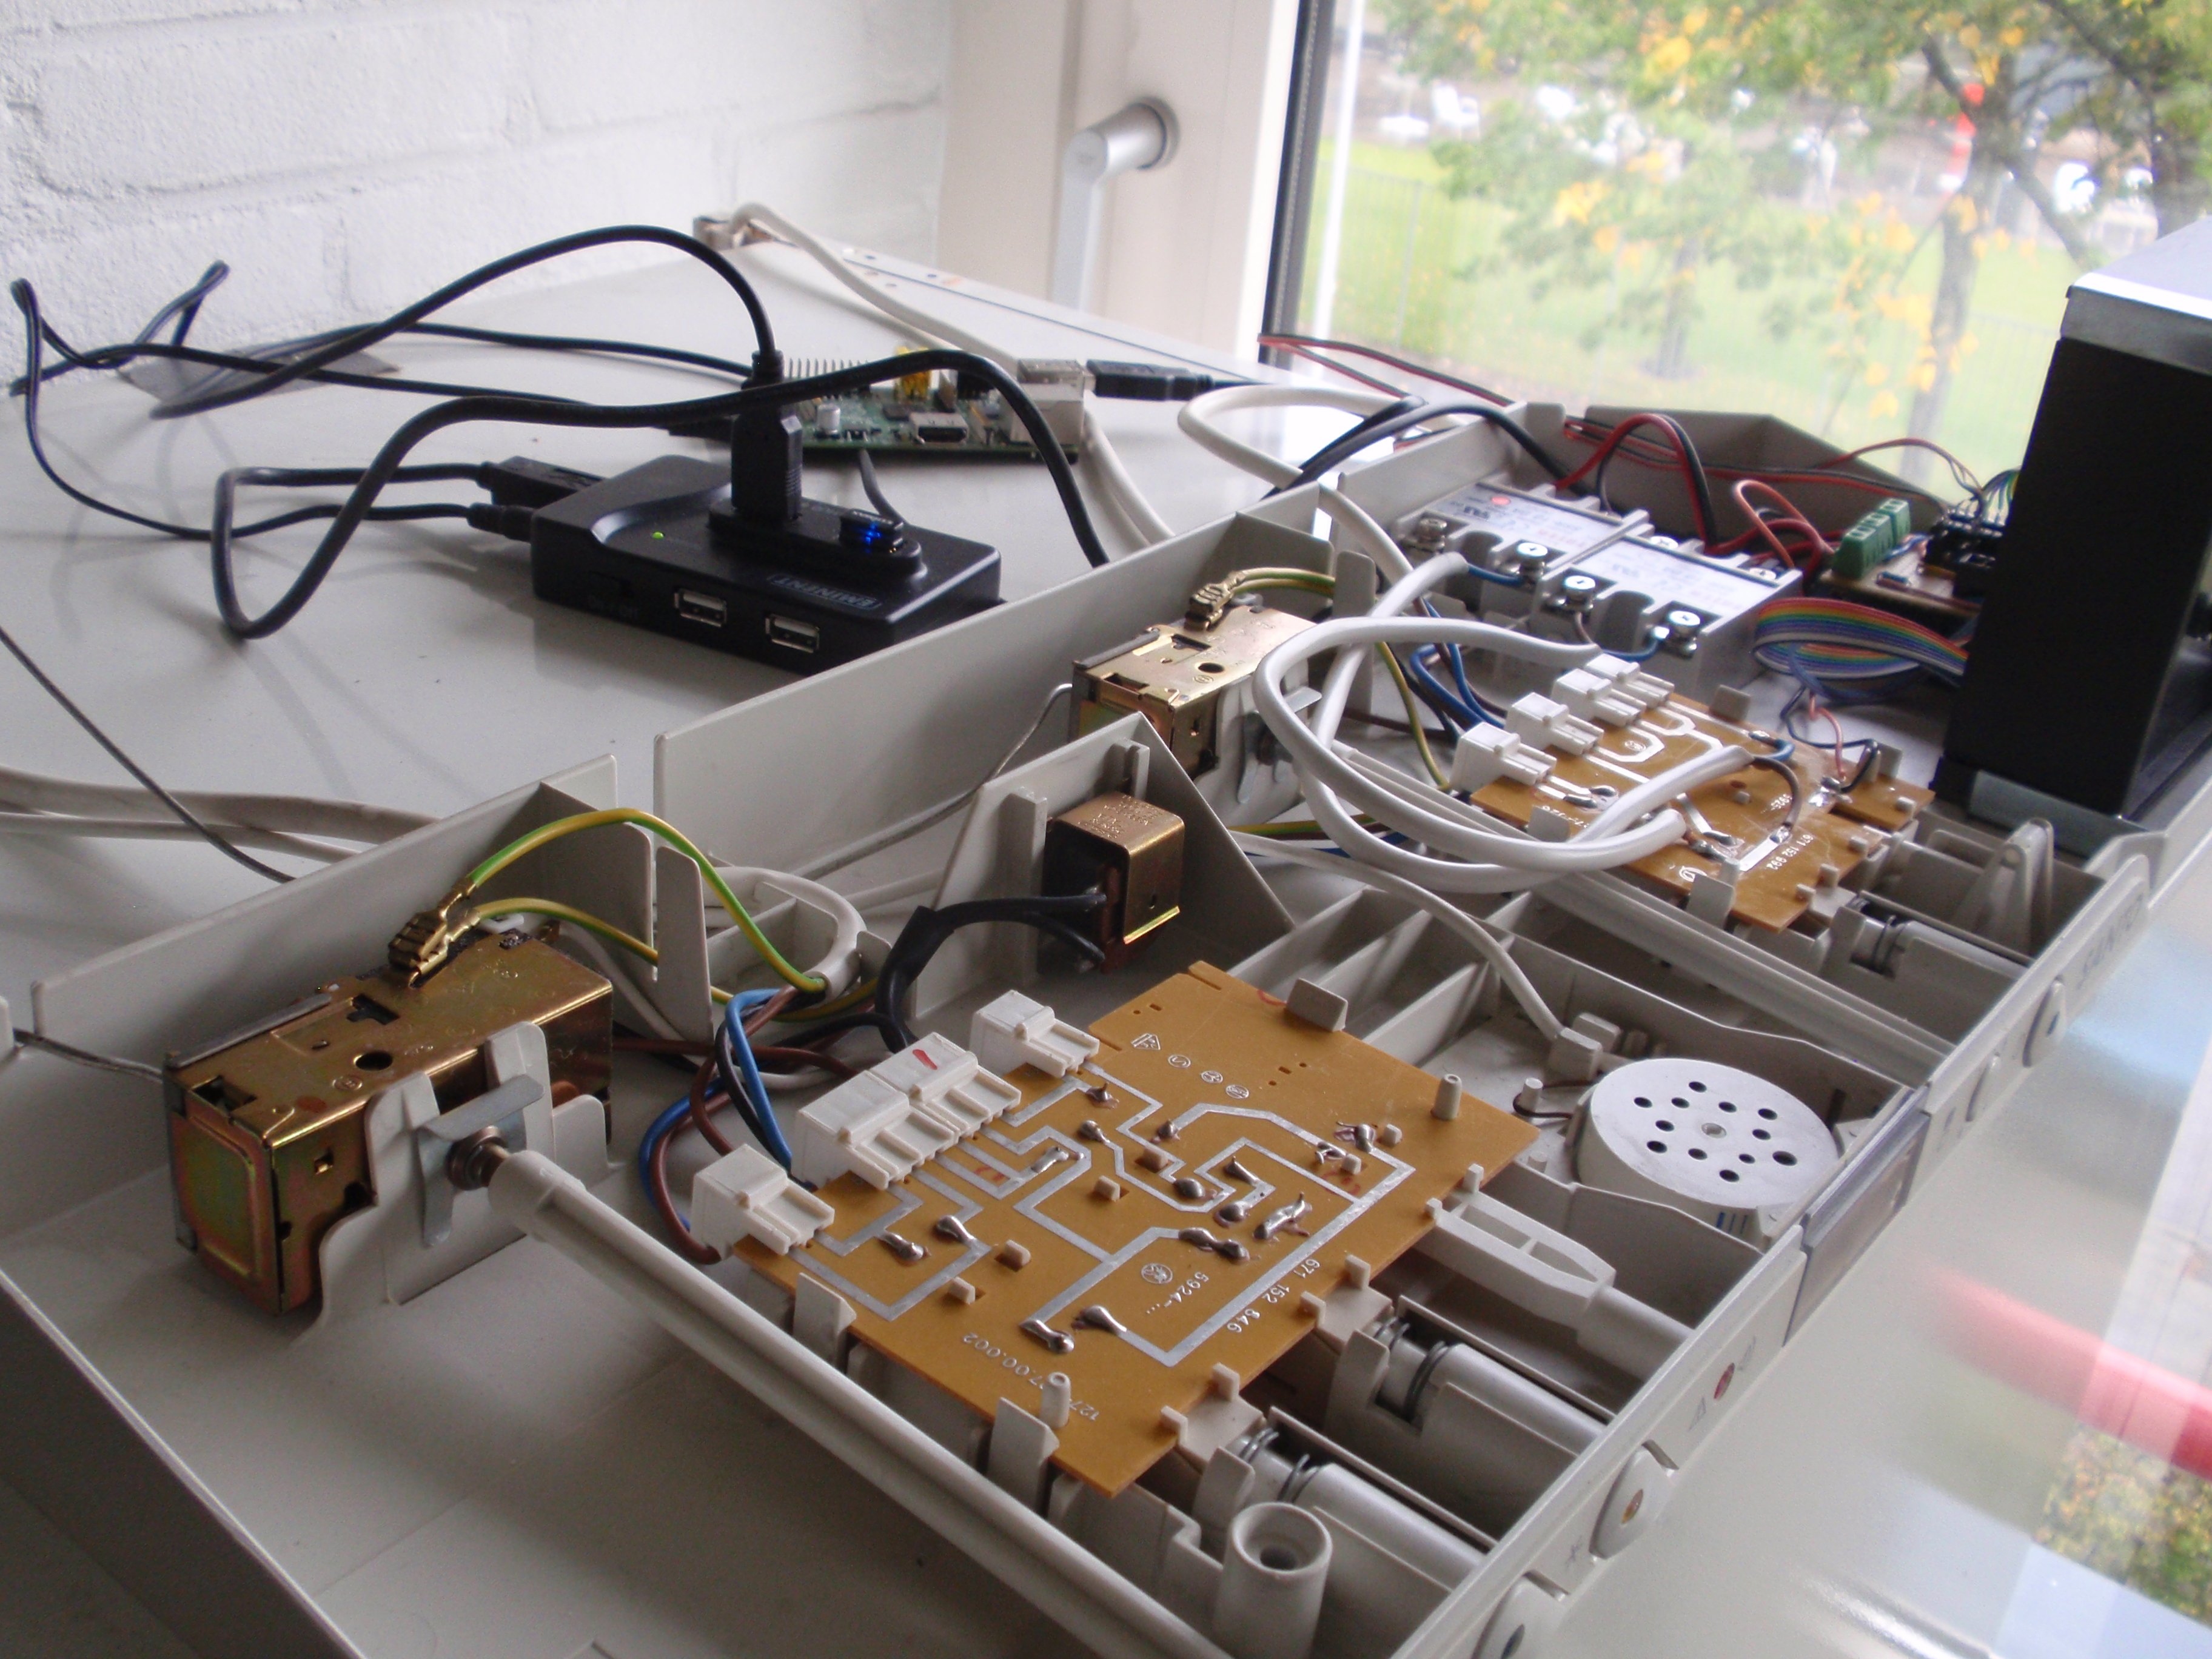
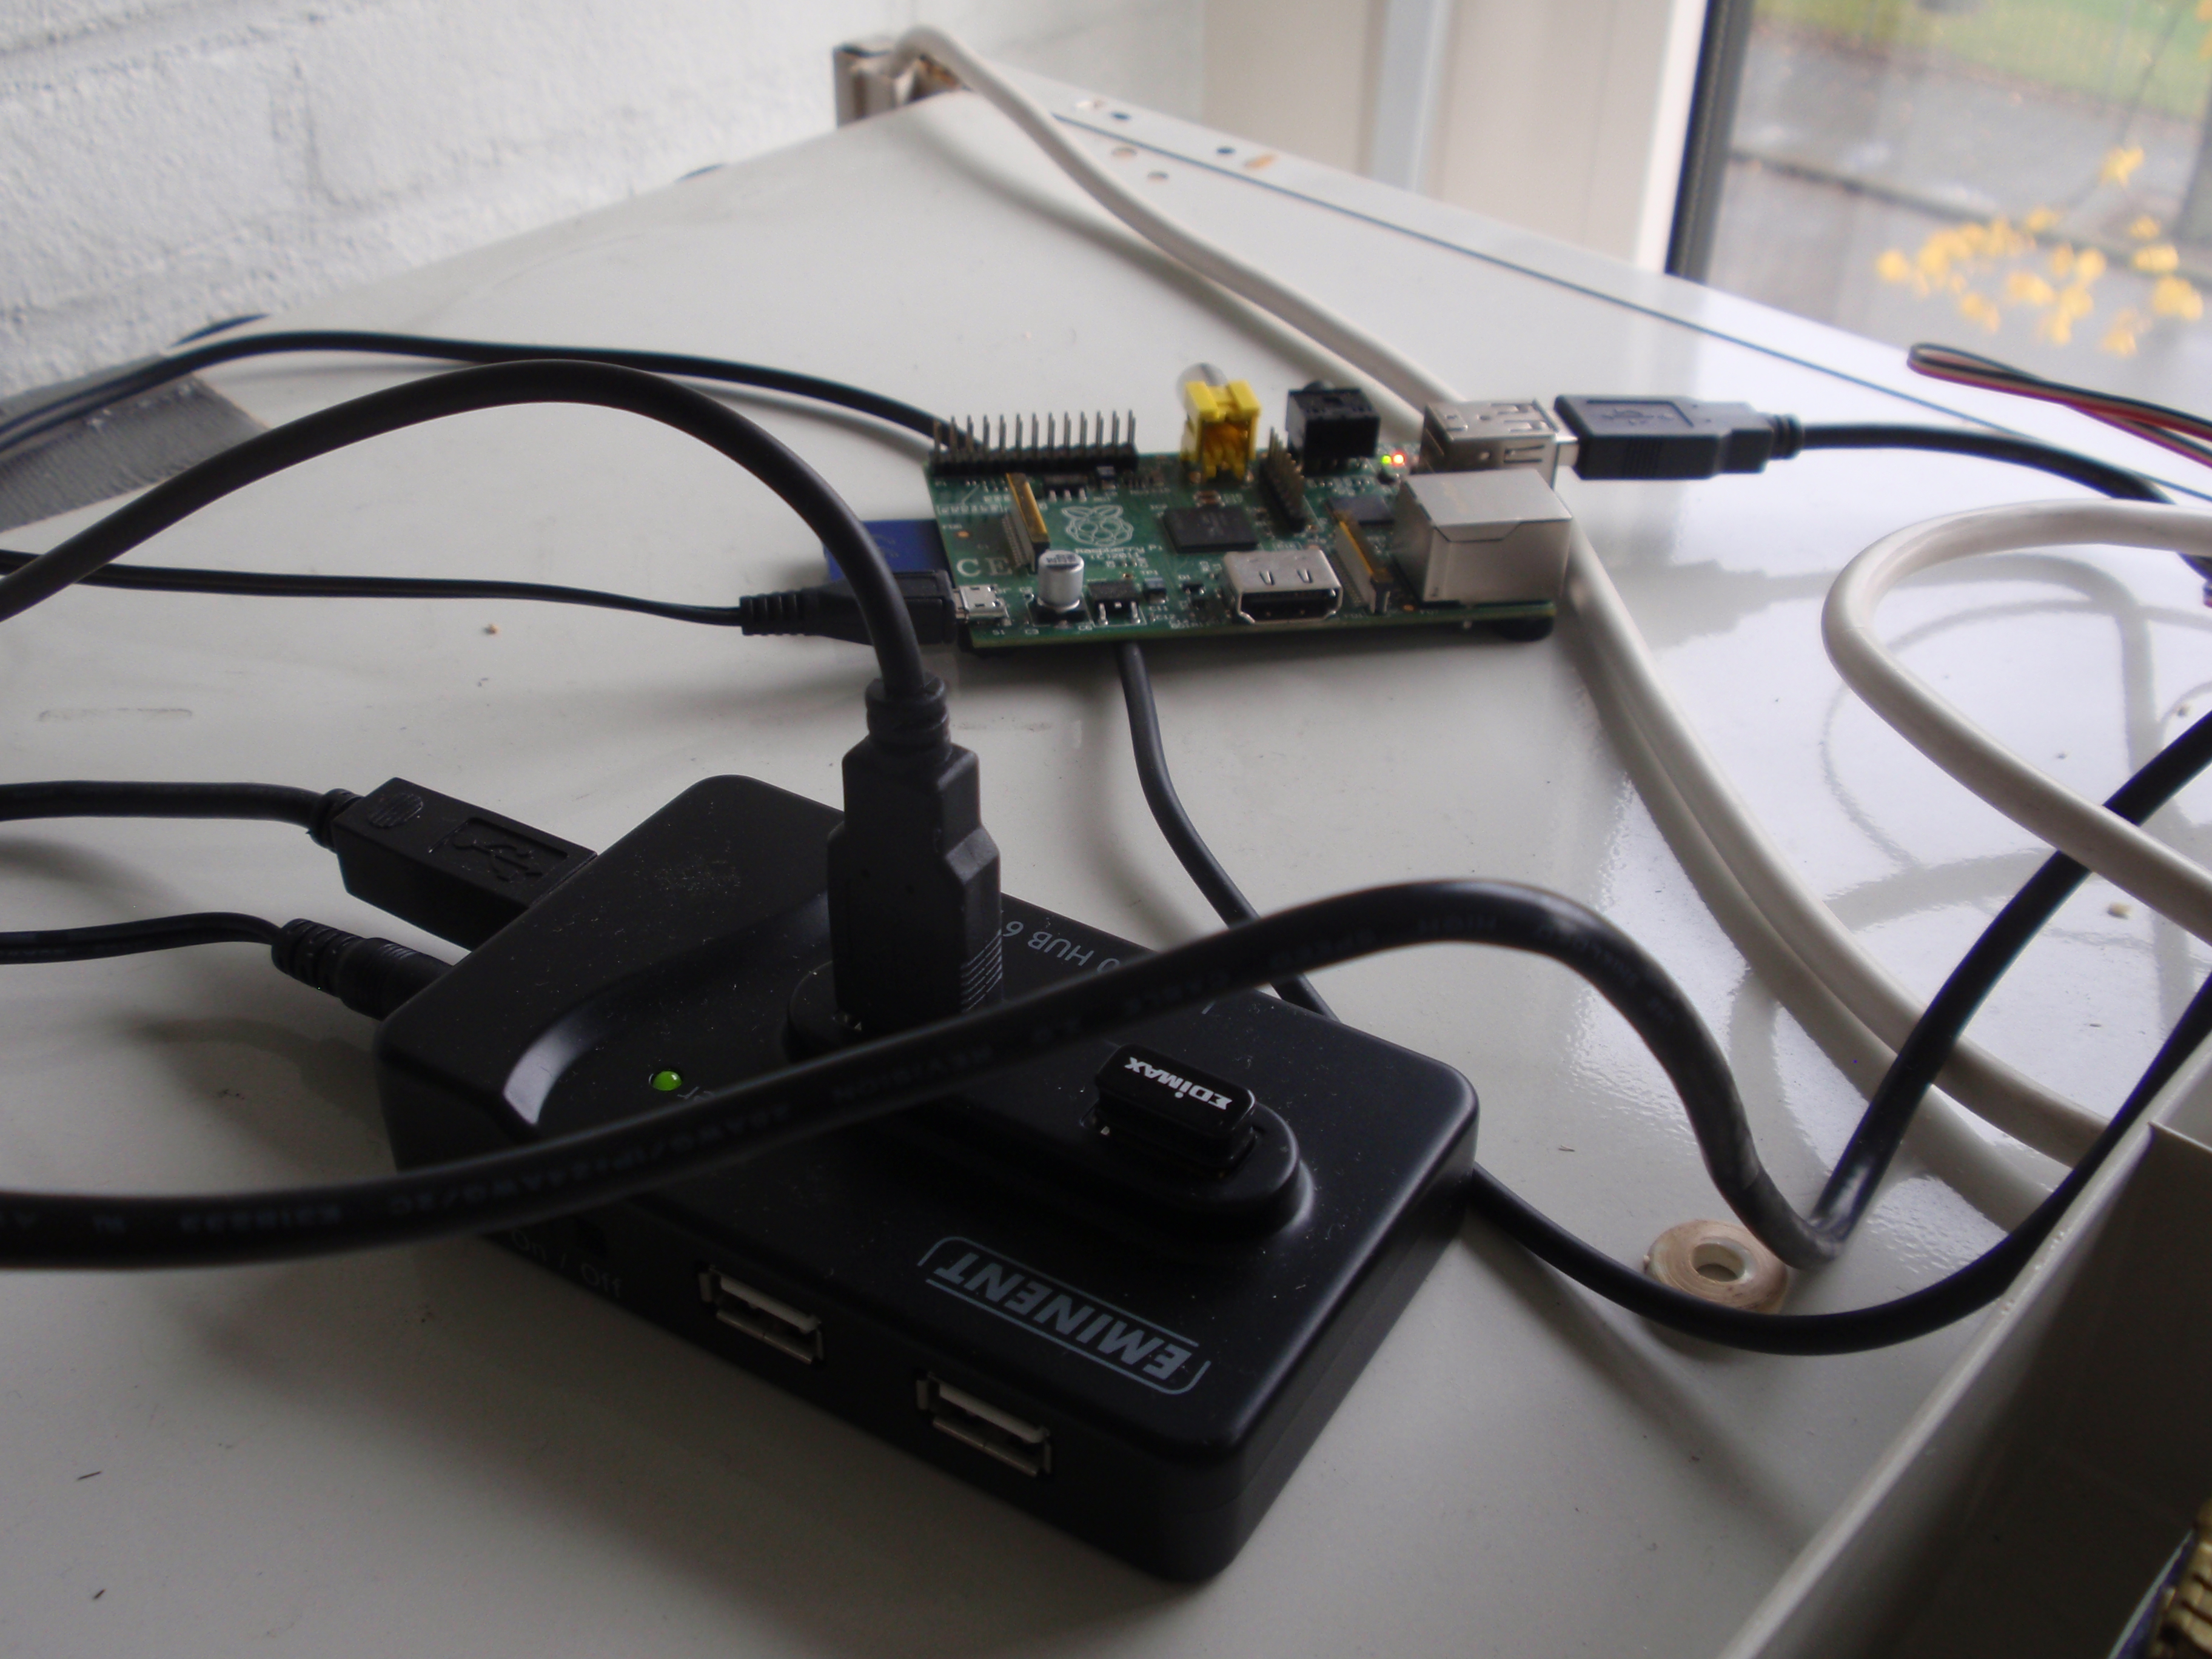
- I use a powered two ampere USB hub to power the Arduino and the WiFi Dongle. Powering the Pi from the hub is possible too.
-

- I am so happy with these new 3-pin DIN connectors for my sensors. Very sturdy, very cheap. The sensors wires run alongside the light bulb wire.
-
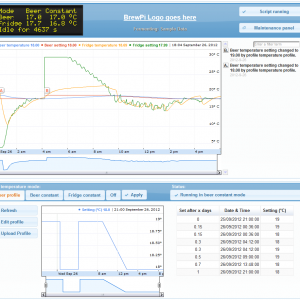
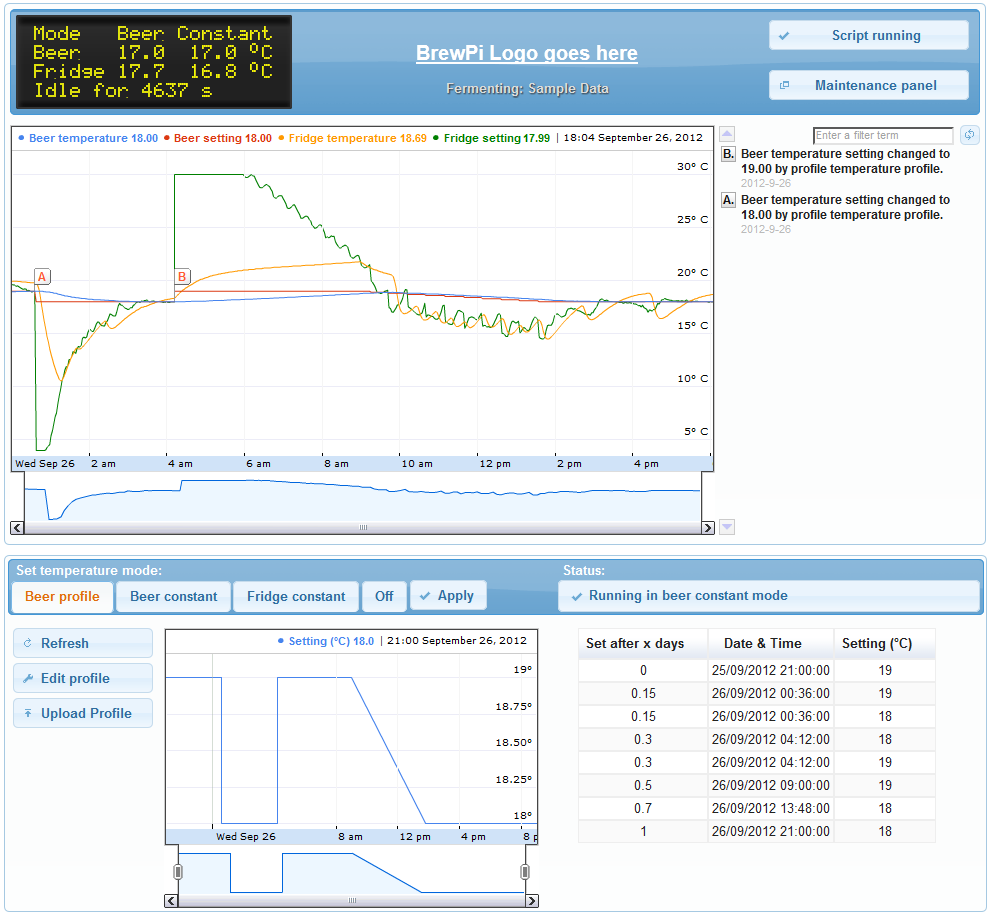
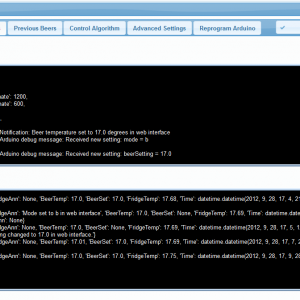
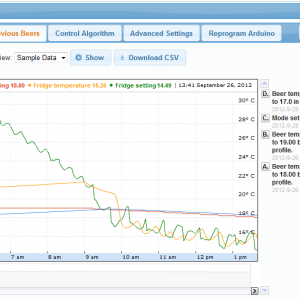
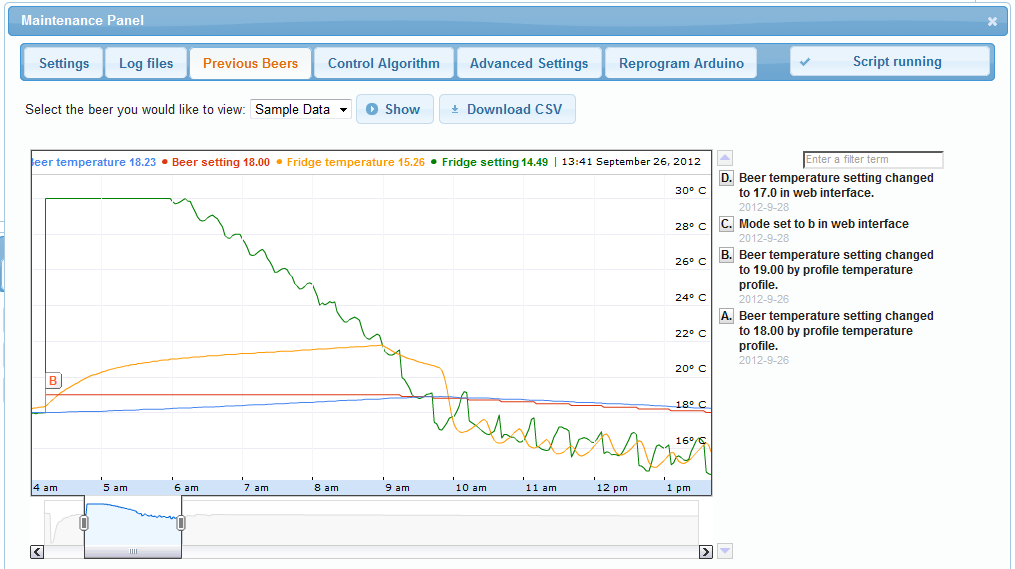
- BrewPi can run in 3 modes: – It can follow a set of temperature points to slowly increase or decrease the temperature. – It can keep the beer temperature constant. – It can keep the fridge temperature constant.The graph in the picture is from running the temperature profile below, but BrewPi has been later set to run in beer constant mode.
-

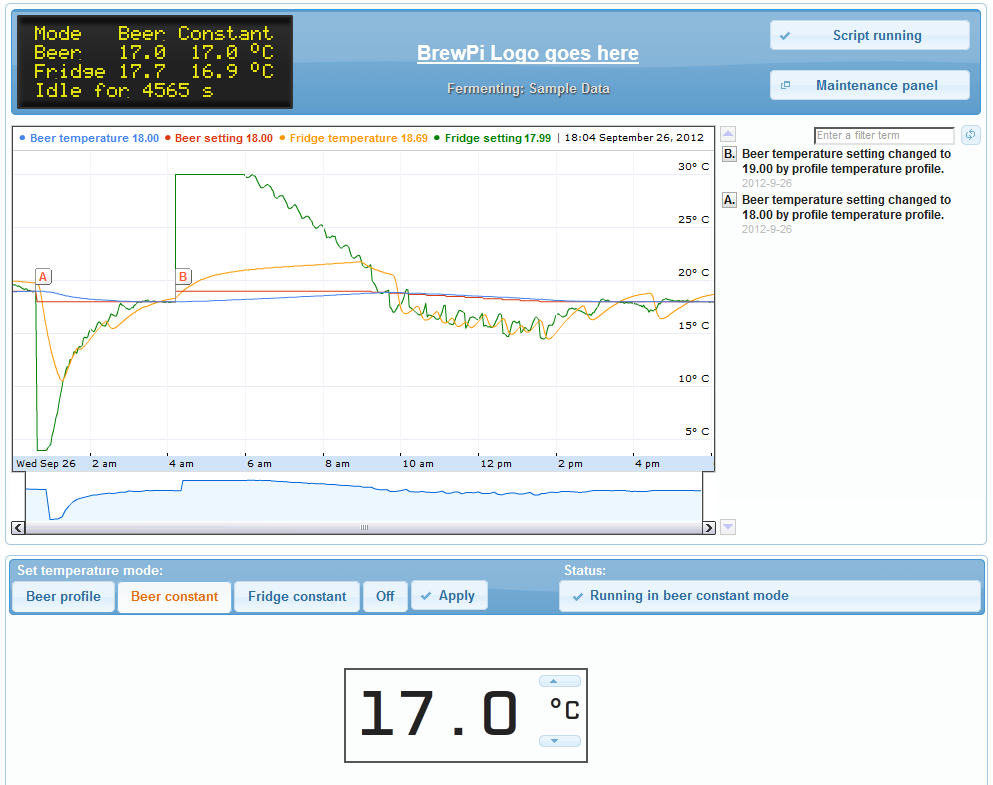
- You can set a temperature in the web interface and when you hit ‘Apply’ it will be sent to the Arduino.
-
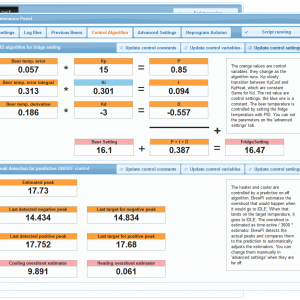
- BrewPi controls the fridge setting to adjust the beer temperature. The fridge setting is the beer setting plus a PID part.From the web interface, you can see how the current fridge setting has been calculated. This makes it a lot easier to tweak the algorithm to work well for your fridge.To control the fridge temperature, BrewPi uses a predictive on-off algorithm: it turns off the cooler when it expects that the overshoot will land exactly on the target temperature. The estimators to predict this overshoot are self-learning. You can see how it performs here.

-
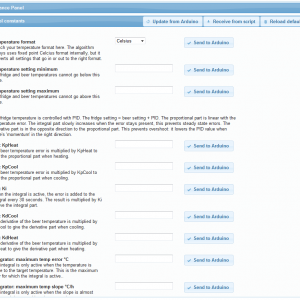
- The Arduino is programmed to send and receive settings as JSON strings. This allows you to configure every detail of the control algorithm from the web interface.
-
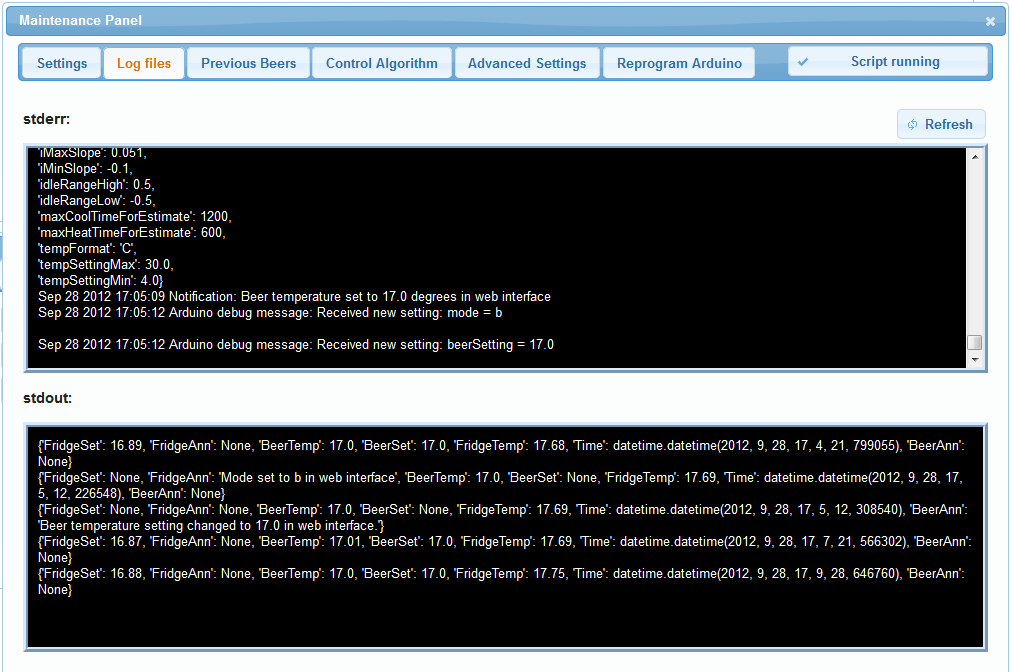
- BrewPi logs all errors and notifications to stderr and all data points to stdout. These two streams are saved to txt files and can be viewed from the web interface. They automatically scroll down to the show the latest logs.
-
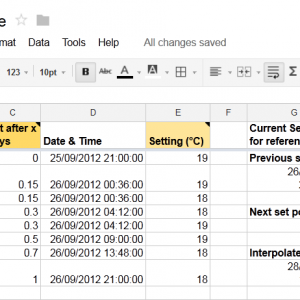
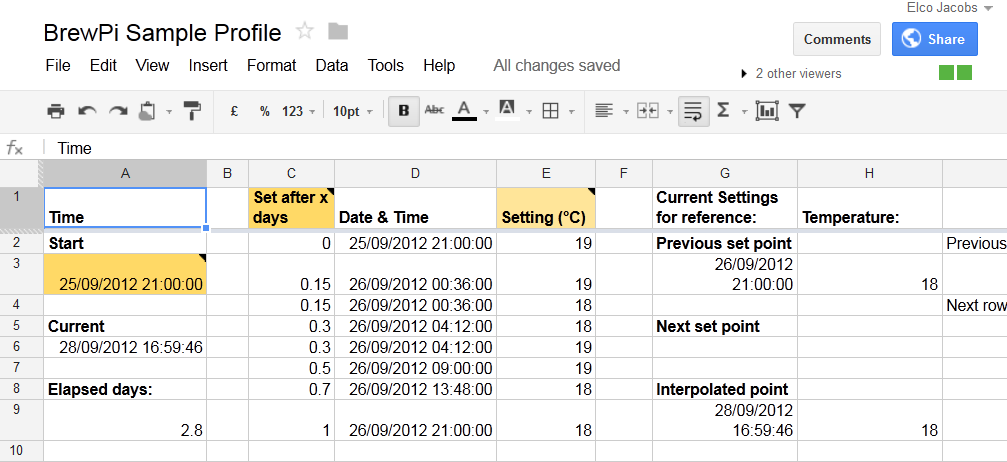
- When BrewPi is running in profile mode, it follows a set of temperature points and interpolates the temperatures in between.You can edit this temperature profile as a Google Docs spreadsheet. When you click ‘upload profile’, it is stored on the Pi as a CSV file which is read by Python.
-

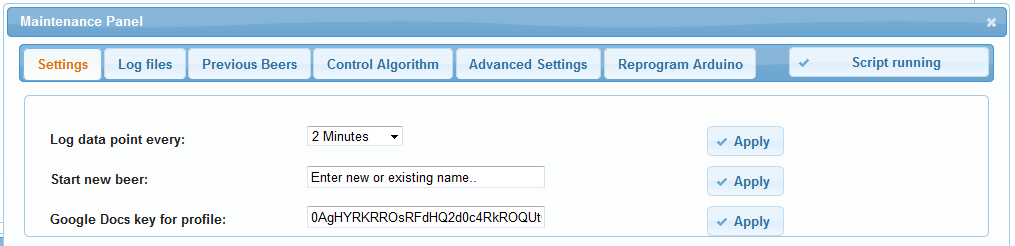
- At the first tab of the maintenance panel you can set the data logging interval, start a new beer and change the document key for your temperature profile.
-
- In the maintenance panel, you can view graphs of previously fermented beers. You can also download the data as a CSV file.
-
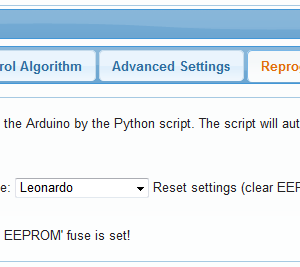
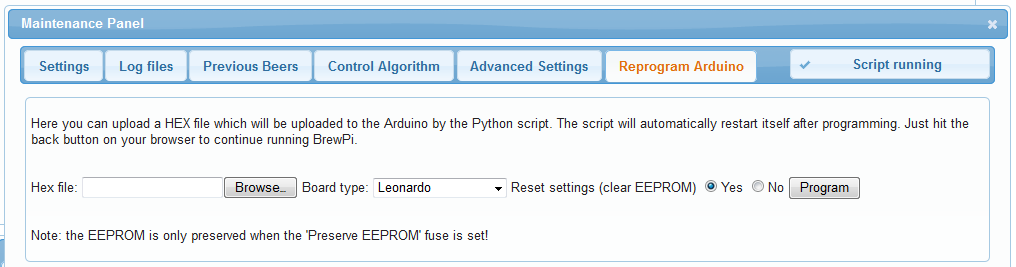
- From the web interface, you can upload a new HEX file to the Arduino. The following steps are done automatically: 1. Your HEX file is uploaded to the Raspberry Pi 2. Python closes the serial port, resets the Arduino and invokes avrdude to upload the HEX to your Arduino. 3. The BrewPi script restarts and continues running.
An introduction
Initially this project was called UberFridge. It ran on a router instead of a Raspberry Pi. There is a write-up on UberFridge on my personal website. I got so much positive responses the UberFridge, that I decided to continue it as an open source project.
First of all: thanks to every brewer that took the time to fill in my interest check survey. It was very valuable in writing a business plan and confirmed that there was a huge demand for a Raspberry Pi based brewing controller like BrewPi (357 full responses and 431 partial responses!).
I have registered BrewPi as a business, because I eventually want to sell complete kits to convert a fridge into a BrewPi fermentation controller. You should be able to buy every component you need in one convenient package, instead of searching the Internet for every part. I am also looking into creating a PCB that already has all connectors for the sensors and the actuators, thermocouple amplifiers, a display connector, JTAG header, etc. This would make it really plug and play. I have the tools for small production runs, but have not found the time yet.
I feel like I have kept you waiting long enough, so I released the software for BrewPi today. Setting up a shop and supplier relations would delay the release too much. There is a perf board friendly layout for a BrewPi Arduino shield further down in this post for the brewers that want to start building today.
My main goal now is to get as many people involved as possible and to provide the tools for smooth collaboration. So everything is open: anybody can edit the Wiki, report bugs in Mantis, clone and fork the GitHub repositories and join the discussion on the forum.
So at the moment I am not selling anything, but you can start building today. If you want to support BrewPi, you can buy me a beer 🙂
What’s new since UberFridge?
Many things have changed and improved in converting UberFridge to BrewPi. It has almost been rewritten from the ground up, so I’ll just mention the major changes here. These changes are partly the result from my experience with UberFridge and partly from moving to the Raspberry Pi as a platform. But mainly these changes have been made to make BrewPi very configurable, usable in many situations and manageable as an open source project. I really want this to be something we will build together, instead of a one man project.
Atmel Studio, C++ classes, JTAG
When I look at the UberFridge Arduino code now, I think it’s a mess. It definitely was not a good starting point for an open source project, so I completely rewrote it. The new code is nicely packed into an Atmel Studio project, which has the fantastic Visual Studio 2010 shell. Try it and you will never go back to the Arduino environment.
If you have a debugger like the AVR Dragon and you buy an Arduino Leonardo, you can debug with JTAG: you can set breakpoints and view all your variables and registers on the target.
The new code is also written fully in C++ and makes extensive use of classes. This makes to code much easier to read and debug.
I didn’t want to go the complicated way of compiling the Arduino libraries and adding a makefile like many other guides on the web. Just download the example project, change two directory settings and you are good to go with AVR studio. There are a few compiler settings that reduce the code size, but make debugging a bit harder. If you want to use Atmel studio for a different project, take a look at this guide.
DS18B20 digital 12 bit temperature sensors
I replaced the analog LM35 temperature sensors with digital DS18B20 sensors from Maxim. They have a 0.0625 °C resolution and are very stable. With some fixed point filters, see next paragraph, the resolution increased even more.
In my UberFridge project, I used 3.5mm jack plugs to connect the sensors. Bad idea, very unreliable! They are now replaced by sturdy 3 pin DIN connectors. Each sensor has it’s own Arduino pin, because they are easier to identify that way.
Each sensor is wrapped in a class that has a fast filter, a slow filter and a filter for the slope of the temperature.
Fixed point variables and filtering
BrewPi, contrary to UberFridge, uses no floats at all. All temperatures and control variables are stored as fixed point integers, with 7 integer bits and 9 fraction bits. (From 64 to 64 degrees Celsius, 512 steps per degree).
If you want to create very slow filter, floats are a bad idea. A very slow low pass filter requires adding a tiny fraction of each new value to the old values. With floating point, you will lose data. The new fixed point filtering class uses 32 bit precision internally, so 16 additional fraction bits, and is configurable to have a step response of 25, 50, 100, 200, 400 or 800 samples. The filter coefficients are configured for the fastest step response without overshoot.
Fahrenheit support
The control algorithm internally uses Celsius, like any good scientist would. But, because for most brewers Celsius doesn’t make sense, temperatures can be converted at the boundary. There are functions to convert from the fixed point format to strings for both Celsius and Fahrenheit. Just flip the switch in the web interface.
The PiLink class
Something I really miss in the Arduino environment is the printf function. It’s a bit expensive in code size, but it’s so nice to have. So I wrapped all the serial communication with the Raspberry Pi in the PiLink class. It has easy to use print functions for debug messages, data logging and annotations. It can also send and receive all variables and settings as JSON strings. This makes it much easier to make everything configurable from the web interface, which brings me to my next point…
Everything configurable!
There is a tab in the maintenance panel now, that lets you configure all the constants for the control algorithm. All settings are stored in EEPROM and will be remembered between restarts. You don’t have to reprogram the Arduino to tweak your controller.
To make it easier to find the right settings, there is a page that displays the control calculations in a clear overview.
For your other projects that require storing settings in EEPROM, take a look at how it’s implemented here. It’s really easy when you wrap your settings in a struct.
A nicer display menu with a rotary encoder
To reassure you that your beer is doing fine every time you pass your UberFridge, I really like the very clear and bright 4×20 character OLED display I have been using. You can build your BrewPi without one. Or you can even use BrewPi without a rasp, data logging and the web interface, just the OLED display. I like to have both. The new OLED class has better initialization and is more stable than the old one.
I previously used 3 buttons for the menu on the fridge. That has been replaced now with a rotary encoder which can be rotated and pushed. Just one knob to easily adjust your temperature settings. See how the rotary class is implemented here.
Solid state relays
I used normal mechanical relays for UberFridge, but I have switched to solid state relays for BrewPi. They can be controlled directly with an Arduino pin and are safer to use than there mechanical relatives.
Safer users and permissions
In UberFridge, everything ran as root. Easy to set up, but not very secure. With the new release, the BrewPi Python script runs under the brewpi user. The web interface runs as the www-data user. There are instructions on the Wiki on how to set up user permissions to make it work smoothly and safely.
Programming the Arduino from Python
In the old UberFridge, the Arduino was programmed by invoking avrdude from PHP with a shell_exec. But giving PHP such privileges isn’t exactly safe. So now PHP uploads a file and asks the Python script to upload it to the Arduino. The Python script parses the Arduino boards.txt file to load the correct parameters, resets the Arduino, uploads the Hex file and restarts the BrewPi script to just continue running.
Keeping brewpi alive with CRON
There is a shell script included that checks that the script is running and to restarts it if not. If it cannot find the serial port it will restart the pi. With this script added to the brewpi user’s crontab, the www-data user doesn’t have to have permissions to start Python, which is a lot safer.
What’s next?
I hope that this is just to beginning and that BrewPi will become an active platform with many users and contributors, instead of a one-man-show. With a wiki, a bug tracker and a forum, I hope I have provided the right tools for collaboration. If you are missing anything, just tell me and I’ll see if I can add it.
A few points came already came up in e-mails and forum posts, which I would like to address here as well.
Why not use just the Raspberri Pi without an Arduino?
There have been examples of brewing controllers that use the Pi’s GPIO pins intead of having and Arduino slave, but having a slave is a deliberate choice for me. The main reason for this is that the Pi is not very stable. I have had it crash on me multiple times. So what happens to the GPIO pins when it crashes? Will it just keep cooling your beer to 4°C and stop your fermentation?
The Arduino slave simply will not crash. Even if the Pi crashes, the temperature control keeps running. Your beer is safe. The worst thing that will happen is that it will not get a new temperature from the temperature profile and no data will be logged.
A microcontroller is better suited to interface low level hardware. The Pi is better suited to log data and provide an interface. I think it’s a better design this way.
Is Arduino the right platform?
The Arduino works fine for now, but I think we will need to move on to something like an ARM Cortex M4 in the future. My Arduino Leonardo only has a few bytes of program space left with the current program. The code space is so large, because almost al variables are 16 or even 32 bit. That takes up a lot of instructions on an 8-bit platform.
The Arduino is fast enough and powerful enough, because it just needs to update its controller once every second. Avr-gcc has absolutely no problem with up to 64 bit variables, but it will cost you in code size. Program size is the main problem.
I have pre-ordered a TI Stellaris Launchpad,but it has not arrived yet. If you manufacture board that you think would be great for BrewPi, feel free to contact me or send me a sample.
Another option would be to make our own board, instead of a shield to plug onto an off-the-shelve board. Let’s discuss that on the forum.
A proper web framework
Before I started this project, I had no experience in PHP, JavaScript, CSS or Python. So what I released today is the result of what I could teach myself with my Google-fu. I just discovered the jQuery UI framework and went from there.
Eventually I would like to move to a framework that allows plugins, skins, etc. But I am not the right guy for the job. So if you feel like you could contribute on this part, start a discussion on the forum.
A digital specific gravity sensor
In my interest check survey, I had some questions about a digital specific gravity sensor. I think I have succeeded in building one and now that BrewPi is finally ready I can start testing it with a real fermenting beer instead of water.
My method involves accurately weighing a weight that is hanging in the beer from a cord. The resulting force gives the buoyancy force, from which the gravity can be calculated.
I don’t want to go into detail about my exact method now. A couple of months after after I have published my method in the interest check, the BeerBug has left its original design that measured capacitance and started using the same method. I want to withhold some details until I have properly tested my design and am ready to get you guys involved.
How to get started TODAY
Go to the Wiki for step-by-step instructions to get BrewPi on your Raspberry Pi.
Download the Arduino shield layout in a PDF document (schematic, top view, bottom view), or as Eagle files. This layout uses 0.1 inch pitch so you can translate it directly to a perf board layout. If you don’t have a JTAG debugger, you can leave out the JTAG connector. You can also leave out the 10k resistors if you use the internal pull-up resistors (there is a #define in the code for this).
You might have noticed that BrewPi doesn’t have a logo yet. Got great design skills? We need you over here!
If you want to stay up to date, you can…
- Follow BrewPi on twitter
- Subscribe to the mailing list
- Follow this blog though RSS
- Subscribe to the blog (side bar on blog)
That’s about it for this update. Cheers!
You can join the forum, report bugs, and view and fork the source code.
Nice project and choice of hardware…
Minor note about the DS18B20 — it does indeed have a resolution of 0.0625°C but its accuracy is only rated as +/-0.5°C.
If the main reason you’re keeping the microcontroller around is because you’re worried about what happens if the RaspberryPi crashes, you could consider using a DS2408 for the relays instead. It’s an addressable switch (i.e. PIO) for the 1-wire bus (which you’re already using anyway), and nothing will happen to the outputs as long as you keep the 5v up to it. That’s what I’m using for my brewery (hot side/mashing) controller, along with a USB 1-wire bus master (you could also use an I2C or serial bus master or maybe bit-bang the GPIO on the RaspberryPi).
You are right about the accuracy! I have changed the wording.
I know the DS2408, I wanted to use it for a different project. But it will not solve the problem. If the output’s don’t change after a crash, that’s a problem too. If it’s stuck in cooling mode, because that was the last thing it was doing before the crash, it will still ruin your fermentation. You want don’t want the control algorithm to be stuck in its last state. It should continue to measure and control the outputs.
For a mashing controller, it’s less of a problem because you are probably watching it anyway and you can reboot on a crash.
Ah, of course, good point. I was just assuming it would reboot following a crash. (The hardware in my case is remarkably stable (PC Engines ALIX, running FreeBSD) so I hadn’t really even thought about that possibility so far.)
It unfortunately does not. If you know a way to make it do that, the problem would be fixed. Maybe something with a wachtdog timer.
BTW BrewPi is in no way limited to the Pi. It’s just uses the Pi as a LAMP server with a USB port.
enable the watchdog timer on the raspberry pi….
http://pi.gadgetoid.co.uk/post/001-who-watches-the-watcher
Nice! Thanks.. will try this soon.
Congratulations on reaching the first release of brewpi! Great to see the updated source is available. I’ve been waiting for the 1-wire temp sensor support – apart from the temp sensors, I bought all the parts to build the uberfridge following the original spec, including 3.5mm jacks and the Buffalow usb router (64MB ram). I’m going to continue using the router, since it’s just going to be running LAMP like the Pi, but what about the 3.5mm jacks and sockets – are they really such a bad solution?
Well, the jack plugs I had where unreliable. The didn’t hold the jack plug properly, so it would stick out half a millimeter and be disconnected.
The DIN connectors have a rotating ring to lock them in place. I bought them for 2 euro each. They are really cheap.
You should consider http://arduino.cc/en/Main/ArduinoBoardMega2560 before going for an ARM setup, this gets you more memory while still being able to use the AVR Studio project and stuff. Also its norwegian tech, it cant go wrong!
Yes it does have more memory, but it is still a limiting platform in the long run. I would not stick with 8 bit. Most code that I have written will be pretty easy to port to a different platform. I think the Arduino mega is a very overpriced board and most projects that use it don’t need it. Most people use it for extra inputs or outputs, but with a few multiplexers and shift registers a normal arduino would be fine.
I wanted to make a couple of suggestions for equipment.
For someone new to electronics who doesn’t feel comfortable wiring up a solid state relay (especially when that is connected to mains power), there is a device that is premade for this purpose.
The powerswitch tail http://www.powerswitchtail.com/Pages/default.aspx is a self contained box with prewired plugs, that controls AC power with a small DC voltage (arduino output). Might be a little bit safer too.
Putting your sensors in beer: I’ve noticed you have soldered them to the end of cat5 cable and are just dangling them in the beer. Personally, that would worry me about plastic, lead , or being a contamination vector. I am using a stainless steel thermowell (http://www.brewershardware.com/16-Stainless-Steel-Thermowell.html) which you can put the probe into, and easily sanitize the outside. You can use a thermowell stopper to allow for a blowoff tube/airlock also (http://morebeer.com/view_product/16672/102282/Stopper_Thermowell).
And a comment! I’m noticing that you using a separate pin for each temperature sensor. From my understanding, part of the benefit of onewire bus is to have one common data line. If one were to expand the brewpi to monitor multiple ferm. tanks, the reduction in wiring complexity would be significant. Of course, then you would have to identify the device IDs of each temperature sensor before installation so you could address the sensors by ID instead of by pin #.
Thanks for the suggestions. The power switch tail is a bit more expensive than the SSR’s, but a bit safer maybe. The SSR’s are also just controlled with a DC voltage from the Arduino, so it just adds the plugs and housing.
I am using waterproof DS18B20’s, like these: https://www.sparkfun.com/products/11050
I have not soldered them myself, only on the DIN connector side. I like the thermowell stopper. Makes it easy to keep it air tight too.
I am using a pin because it is easier to distinguish between the sensors that way. You can use the device addresses too, but not having to configure it was exactly the reason. You will generally use a microcontroller per fermenter anyway, because it runs the temperature control too. The Pi can be shared for multiple fermenters.
There seems to be some discussion on whether those probes would add any off flavors to a fermenting beer since the alcohol in combination with the plastic could leech some flavors. The stainless steel makes me more comfortable, plus you don’t have to worry about a cut / leak in the cable.
I agree, its a bit more expensive but it is better. I’ll probably shove that sensor inside a thermowell too.
I’d like to offer that this is a fantastic source of thermowells that fit our typical stoppers and carboy bungs. The quality of the workmanship is first class, the end is neatly rolled, tig welded and polished out; they are absolutely sanitary.
https://www.brewershardware.com/16-Stainless-Steel-Thermowell.html
I have used DS18B20 probes inside 10mm copper pipe that is crimped and soldered at the end for cooking sous vide. Heatsink compound aka diaper cream helps the thermal contact.
James, that is exactly what I linked ^^ !!
David,
Awesome man, it’s a great thermowell. Far better quality than those ones they sell with the stopper for more money on some of the big home brewing sites.
Regards,
James R.
Use an opto coupler between the SSR and Arduino to isolate the ac mains from the low voltage circuitry.
It’s inside the SSR:
http://www.fotek.com.hk/solid/SSR-1.htm
Full datasheet: http://www.fotek.com.tw/pdf/etc_34.pdf
Have you considered doing a kickstarter.com project? If your serious about launching this into a business its a good platform to get started.
I have. It’s a bit overkill for the basic Arduino shield. But for the gravity sensor I’ll probably use kickstarter.
Put the whole system device into kickstarter not just a sub-component (if I read your remark correctly). There was a project for an empty bottle cutter to make drinking glasses that was well done on the presentation/business plan.
Hi,
Having worked in Industrial control environments once or twice,
Normally in a situation such as this one would use some sort intelligent or (perhaps preferably) non-intelligent control circuitry and have a intelligent monitoring/alarm system.
ala SCADA
Cheers
This is similar (but way better) to something I did a few years ago: http://blog.stephenashelton.com/fermentation-controller/ I never did finish documenting all the work I did on that project. Very cool work you’ve done!
Forgive me if I missed it – but who is your supplier for the OLED? Do you have a part number? Looks fantastic!
I got it off eBay. They are awesome and cheap.
I was able to find the part on digikey.com also.
Have you considered the ChipKit Uno32 instead of the Arduino? Slightly more memory than the arduino.
*Microchip® PIC32MX320F128 processor
*80 Mhz 32-bit MIPS
*128K Flash, 16K SRAM
*Compatible with many existing Arduino™ code examples, reference materials and other resources
*Can also be programmed using Microchip’s MPLAB® IDE (along with a PICkit 3 and our PICkit3 Programming Cable Kit, seen below)
*Arduino™ “Uno” form factor
*Compatible with many Arduino™ shields
*42 available I/O
*User LED
*Connects to a PC using a USB A -> mini B cable (not included)
I have not. I was looking at the ARM Cortex, I’m expecting this board to be delivered soon: http://www.ti.com/ww/en/launchpad/stellaris_head.html?DCMP=stellaris-launchpad&HQS=stellaris-launchpad-b
They look very similar. Thoughts?
I have a ChipKIT with Wifi shield and may well attempt something along the lines of BrewPi with it. Its selling point seems to be Arduino compatiibiity. The Stellaris has slightly better specs and is much cheaper.
Well, the Arduino code should be phased out eventually. I am not using that many Arduino functions and have wrapped it nicely in classes. So only the low level functions have to be changed.
Proof that if you procrastinate long enough, somebody will complete that idea you had and pull it off much better than you could ever have hoped to 🙂
Bravo. I would definitely buy this.
Awesome setup! I’ve been considering a project like this, but I was thinking I would need both a compressor and a separate heating unit.
Does the light bulb warm efficiently? Also, what’s the high end temperature you can get with it? I brew in my basement in wintertime in Chicago, and a space heater has been a must in the past.
Regardless, cheers on a great project! 🙂
It’s 25W. It depends on the isolation of your fridge of course. It can get my fridge up to 30 degrees without any problems. I don’t allow it to go higher. You could always go with a bigger bulb, but you have to make the surroundings of the bulb heat proof and make sure your fridge circuitry can handle the higher power.
This fridge system could also be used for other yummy fermented foods: kimchi (and other fermented veggies) and cured meats 🙂 🙂 Nice work!!
Coffee roasting benefits from repeatable heat profiles as well as brewing. No need for refrigeration, just heat and fan control. The key difference here is that heat and fan are simultaneous. I can see how this interface would work very well for precision roasting!
I would like to go to a setup where I use one fridge for beer fermentation, and another for cheese / meat / sausage drying. This latter would involve the same set-up in terms of temperature control, but would also need air-flow control and a sensor + control point for a humidifier.
Elco: Do you think the current Arduino/R-Pi combination would be able to hande 1) multiple fridge setups, and 2) extension into other types of sensors?
(Excellent work btw!)
I’d go for one pi and two Arduino’s. Adding additional sensors and actuators shouldn’t be much of a problem.
Don’t limit the system to beer. I started brewing beer but also migrated into wine. Some differences but you’re still fermenting with yeasts and have the same time/temperature challenges. Expanding into the wine side will double/triple users and buyers. Great project.
Would anything need to be changed to use it for wine then? Or do you just mean mention wine sometimes?
I hope you don’t abandon the Arduino Leonardo too quickly, I just ordered one so that I can jump in on the action. I had an Arduino clone, OSEPP Uno laying around but was afraid the differences might be enough that your code would require more adjustment than I want to deal with early on in getting mine going. Please don’t abandon the Leonardo too quickly, a lot of us are wanting to get going but not have our initial investment of hardware and time left in the dust.
I also wanted to know, what’s involved in perhaps simply running just the Arduino component? Even without all the sophisticated Raspberry Pi aspect this seems a far better basic temp controller than most of the Aubern’s etc et al general USE PID controllers typically used.
Can one simply build only the Arduino side of things and run that for a while before investing the time and effort in getting the Raspberry Pi side of things up and running? If so how do you handle the PID tuning and all of that? Will it simply start from the initial values provided in the code and begin self tuning or do we have to get into the web interface to kick things off? Thanks for your time and effort…
Of course there will be support for the Leonardo too. I am using one myself. Moving to another platform will be slow process. You can run the Arduino without the Raspberry PI. Just the display and rotary encode menu. You can get the parameters in the web interface by sending commands directly to the serial port.
c will give you all the control constants, v all the variables and s the settings.
j{mode: b, beerTemp:20.1} will set the mode to beer constant and the temperature to 20 degrees.
Thanks for your useful reply Elco! My Leonardo should show up any day now as well as the same OLED display you’re using, both ordered from Digikey. Now I just need to get the temp sensors, I already have a gaggle of SSR’s including the style you’re using from Ebay 🙂 I’m very interested and might like to see if I can’t find ways to help myself, I’m a Sr. Hardware Engineer for a major consumer electronics engineer and while I’ve done a bit of programming here and there I’ve mostly avoided it sticking to hardware. This should make for a good opportunity to force me out of my box a little.
Ultimately I think it’d be great if it can all be laid out on a common PCB and pre-programmed so that lay persons can have access to this awesome temp controller system.
Not enough coffee clearly. I meant to say, hardware engineer with a major consumer electronics company. I’d like to help out in any way that I can. That said it seems you’ve got things fairly under control. If I do a layout that pulls all the pieces together I’ll gladly share the CAM and native design files.
That’s where I’d like to see the project go. I want to create a shield for one of the ARM cortex boards and sell it fully assembled.
Can’t beat the price on the LM4F120 Stellaris board, $5.60 it’s just unreal that’s 1/5th the price of the Arduino and the Stellaris is comparatively an absolute beast.
Great project! Might be the motivation I need to actually start brewing beer.
Since you mentioned ARM, you should check out the Teensy 3.0.
It uses an ARM Cortex M4 and can be programmed like an Arduino (or directly in C). It was recently funded on Kickstarter, and you can get them from Adafruit for $28:
https://www.adafruit.com/products/1044
I haven’t gotten mine yet, but they look pretty nice!
Ha! I guess I hadn’t refreshed in a couple minutes when I made my comment directly below yours. Good minds think alike?
I think you should consider using a Teensy 3 for your microcontroller. It uses an ARM M4 chip (not the M4F though). And has great crossover appeal for Arduino users.
http://www.kickstarter.com/projects/paulstoffregen/teensy-30-32-bit-arm-cortex-m4-usable-in-arduino-a
http://www.pjrc.com/store/teensy3.html
First of all, thanks for info on the project, we’re def. gonna implement it. I checked out your excellent tutorial from sat:
http://www.elcojacobs.com/easy-to-use-atmel-studio-project-for-arduino-and-programming-the-arduino-from-python/
And noticed you still were running the dinky Arduino env. for a Serial Monitor,can’t you just go this route and install the Terminal extension in AVR Studio:
http://www.jayconsystems.com/tutorial/cat/Arduino/post/atmerpt1/
Thanks for the suggestion.
When I start debugging again I’ll also try to call the python script with the terminal extension.
There’s a new dev board on it’s way: http://www.kickstarter.com/projects/kuy/galago-make-things-better It’s a cost effective 32-bit Arm board.
Looks good. An integrated debugger is a must for me, so it wins from the teensy 3.
But how does it compare to the Stellaris launchpad on how long will it take to get to the market?
I love this project! Glad to see it up and running for you and I am very excited for the future. That being said, I am more of a software nut instead of hardware and have about 0 experience working with hardware. Any estimated dates on when a plug and play kit may be available? Would love to get my hands on one of these for my new house and my work shop in the basement. Something about a sensored brewing operation just sounds right to me.
I don’t understand the advantage over a thermostat 🙁
Lewis,
The advantages lie in parts of the system. If you build just the Arduino part of the system you would have yourself a very nice temperature controller that is based on PID (Proportional, Integral & Derivative) temperature control techniques as opposed to a simple thermostat. The latter is inferior because the regulation of the temperature is quite poor really. You have a target temp and a hysteresis (dead band) value. Say you set it to 65F for an Ale and Hysteresis is a few degrees. The fridge might say kick on at 67F and your heater kicks on at 63F leaving you with a 4 degree swing that’s constantly knocking back and forth. Truth is however it will be much worse because the controller is dumb. For instance the compressor will shut off at 63F however the air around the fermentation vessel, the walls of the fridge all have stored energy and will continue to transfer that to your vessel so the temp will undershoot even further. The only way to fix that is simply reduce the hysteresis to a small value in which case you will have horrible efficiency, the system will literally oscillate back and forth fighting itself at each end as it chronically overshoots, then OMG reacts turning on the compressor and undershoots then OMG reacts and turns the heater back on. It’s a vicious cycle and pulling and pushing 5~10 gallons of fluid around is expensive and at the end you have poor temperature regulation.
With an adaptive PID approach the system actually learns the dynamics of how the vessel temp responds to the applications of the input of the compressor cooling and the heater heating. It learns what the rise and fall time of the temps are in response to those inputs, it learns how much overshoot will occur if the heat or cold aren’t drawn back before the setpoint is reached etc.
Maybe a good way to think about it in lay terms is. Imagine you’re driving a car and you’re told to stop at a line. You begin driving towards the line and when your tires touch it you slam on your brakes and come to a screeching halt 20 feet past the line, you see this and go ohh crap, throw it in reverse and slam your brakes when you hit the line and now you’re 20 feet shy…a vicious cycle. The PID would do what you’d would really do, you’d see how fast you’re approaching the line, you’d let off the gas and gently apply the brake to come to a controlled stop precisely at the line. If you went over but only a little over you’d very gently correct that error…
Do you see a benefit now? Add in the raspberry pi side of it and you get a nice interface to the variables and the ability to see all of the data logged and also do cool things like schedule changes in temperature. For instance if you pitched a little warmer than you planned to ferment (not atypical at all) you could simply put into the temp schedule to very slowly and gradually pull the temp down to your desired temp over the course of hours instead of ripping it down to the set-point and undershooting viciously like a thermostat would.
Thanks for your reply James, great explanation.
Small correction on the benefit of being able to set a temperature profile:
The PID algorithm should be enough to prevent overshoot. The temperature profile is to be able to slowly change the temperature to not shock the yeast.
You could for instance slowly raise the temperature at the end of fermentation to improve attenuation.
Aye that’s what I was trying to get at. For instance it’s not uncommon to pitch at a temp that’s higher than your desired ferment temp, esp for a Lager. Because of the temp profile scheduling and I assume it interpolating between points you could simply make the first set point the pitch temp and the second setpoint the desired lager temp and figure out the max slope you’re willing to subject the yeast too and from that you know how many hours out to place the lagering setpoint. The system would then simply over the course of those hours keep stepping down at the desired rate until that setpoint value is maintained or changed again.
Nice project. Can I find somewhere instructions how to do it? I know nothing about electronics but I know how the software works and how to program it.
I will try to post detailed build instructions today or tomorrow. You should be able to buy pre-assembled electronics within 3-4 weeks too.
that would be great! keep us updated.
thanks a lot
So…how hard do you think it’d be to add a USB webcam, and either LED’s inside the fridge that are controlled to turn on by an output from the arduino or pi, or else control the door contact to turn the light on inside the fridge? Just thinking of a way to see the krausen (when using carboys) without opening the door =)
This is actually an idea I already had, but have not had the time to implement. I think you can used plug a USB webcam into the Pi. I suppose you can find an open source way to get a web interface to the webcam. I now have the light bulb to serve as a heater too, but I’ll probably add a separate heating output because my fermenter is now see-through.
When you add that output for the heater are you going to PWM? I’ve seen two approaches to this, the simplest is simply on-off with some reasonable duration limitations like 1 second on 1 second off and no faster. Better I’ve seen is what I had when I kept pythons as a hobby. It was a PID based thermostat which did phase control with a TRIAC so it was essentially a PID controlled lamp dimmer. As you approach the setpoint the system would start to dial back the heater smoothly instead of pulsed. It cost more parts but the designer explained the motivation was to give better bulb life and also to avoid the obnoxious flashing on and off of the red reptile bulbs because not everyone uses ceramic heat or radiant heat (I used the latter myself as it’s the best, though not cheap). I’m assuming (having not picked apart your code) that you don’t pulse the bulb as you approach the set point to avoid overshoot but instead turn the bulb off completely before the setpoint is reached and, “coast” to the target value?
Right now, it’s on-off, not PWM. But it’s with predicting overshoot, so yes ‘coasting’. There are hard limits for the minimum on-off interval, around 10 minutes. The PID algorithm determines the difference between the fridge setting and the beer temperature.
The SSR’s I am using have something like a TRIAC inside, so they will always switch on a zero crossing. For the shield I’ll just use open drain outputs with pull-up resistor and a protection diode. That’s the most versatile for different actuator circuits.
I just received some peltier elements for the next experiment, so I’ll definitely play with PWM as well.
Judging by the graphs it seems that it works well enough. I had assumed you were using on-off for the cold side because of the compressor requirements to be idle for ~5 minutes or so between re-starts and using low frequency PWM (for lack of better terminology) for the heater since most bulbs and ceratinly any radiant heat panel won’t mind this. The latter are frequently plugged into lamp dimmer type devices for variable output or fed half wave rectified AC for a HI and LO mode.
As for the SSR’s, I’m quite familiar. I have some of the larger 40A version of the same Fotek ones you’ve got. They make me nervous on some levels though; they seem too cheap to be true and if you look around outside of ebay you’ll find those same Fotek ones selling for $40~60 Vs the <$10 I paid for mine. Factory seconds, counterfeit? In fact the temp controller box I built and use now based on the STC-1000 aquarium controller uses instead a SSR from Crydom. I may still use the Fotek for this though as I'm not breaking down the other box, it's too nicely built to destroy.
The Peltier are great, you can just throw them in the middle of an H-Bridge and switch between heat and cool on a unipolar supply. They'd be perfect for doing a small, "yeast starter" box or something along those lines. A lot of those bachelor pad fridges are TEC based, they'd be a great place to start modifying for a yeast fridge.
According to the website, it looks like the Galago will ship in November.
Know what would be amazing? Have the BrewPi ‘talk’ with SmartThings (Kickstarter finished campaign) in order to get updates and alerts on the homebrews. Excited for when the electronics on this come prepackaged and I can get build instructions.
On the matter of the Stellaris Launchpad, Avnet is selling them for $5.60 each; that is an absolutely insane value. With 256k of FLASH you’d have plenty of room for growth. I think I’m going to pick up a couple and toss em in the box of goodies, at that price you can’t go wrong. Any movement on a shield board / kit for the Leonardo? I suppose I could do one myself but schematics and boards is what I do all day it gets hard to motivate. If you do one I’ll probably buy it out of sheer laziness 🙂
They are indeed great value for money. The official price is 13 bucks now, 5 was introductory. Still great value.
But I have contacted the guy behind the Galago and feel pretty good about collaborating with them at the moment. Its an NXP ARM processor with an ATTiny programmed for GDB debugging. There are more details on the forum.
I can just get the programmed attiny’s from him for the debug functionality and design my own Galago compatible board, instead of a shield. This way you will get one board with everything you need on it. I’ll probably do a general brewery control board and a smaller carboy mounted board.
I’ll start on the Arduino shield tomorrow. For me my tax report was hard to get motivated for. Designing the shield is fun.
Yeah an excellent value and Avnet still has them for <$6 each. I looked at the Galago and it certainly looks like a good direction to head in, the debugging being built in without needing any extra tools is nice and should help people moving forward to implement their desired modifications. The NXP ARM's are excellent processors, I've been using them for a number of years. We've got a good number of products using the relatively aged LPC2220 device to good effect. Good news on the sheild. If you don't mind my asking what will you be doing the layout in? If I had to guess I'd assume Eagle…
Yes, I will use Eagle. Mainly because it is easy/free to use for others as well.
Hello Elco,
Awesome work!!! But is the avr code compatible with Arduino Uno. Will you provide support to port it to Uno?
Also can it drive a 2×16 LCD?
Thanks in advace!
I already created an atmega328 branch for the Uno. The rotary encoder code has not been updated, but the rest works. I’ll fix the rotary encoder code this week probably. Taxes report was due today, so I just had no time.
The code for a 2 row display is almost the same, you just write to a different index. But I feel the 4 row display is small already, so I would definitely go for 4 rows. If you have space left, just put the name of the currently fermenting brew there for style points.
Cool. If you get your hands on how rotary encoder interfaces with the rest of the code consider the option to return keypress values so it can easily be replaced by other types of keypads like 3 button analog.
You are right about the size. 16×2 is small but it is siitng around my stock and it will lowered my cost about $20. After all i just want to have an information about current status and temps and a menu to overide all of the control and use it as a simple fridge. All other settins adn interface is done more effectively from the web interface. (a mobile version is to be done?)
Will you post atmega328 branch on github? I’m really anxious to start building it!
And just another question: is there any particular reason that you use two pins for OneWire sensors or it is just a leftover from LMs era?
The atmega328 branch is already on github. You will have to select a different branch than the master branch.
I use 2 pins, because you don’t have to know the device addresses then. Each pin will only have one device.
I will not add code for the 16×2 LCD myself, but to do it yourself will not be too hard.
First off, let me applaude the project. Very nice. I have NO experience in programming, and I was therefore more prone to choosing a PID controller to control the temperature. Of course this solution does not allow data collection. Based on your nice project and presentation, I am keened to follow your approach to control fermentation.
However, I have some trouble understanding the basic concept of the setup. I have been reading about the Arduino, and it seems to me to be a little like an advanced PLC (programmable logic controller). It can control and monitor via various I/O pins.
The Raspberry Pi, as I understand it, is just a very small computer running on Linux.
What is then the advantage of using the Raspberry Pi? Is it not possible to perform the same functions with an ordinary PC?
Best regards
Stefan
You are correct in your understanding. It is perfectly possible to use a normal PC. The Raspberry Pi is just a PC for 35 dollar and therefore a cheap and low power solution.
Hi Elco,
Thanks for the BrewPI! Just a question on building the arduino code – it seems like atmel studio 6 is only available for windows…are you aware of any toolchain or IDe that can be used in linux or mac osx?
John
On the forum a user is using Atmel studio in a Windows 7 virtual machine. I do recommend to use Atmel Studio, the interface is great.
The project is compiled with avrgcc, which is available for other platforms as well, but the compilation settings are set in the project properties in Atmel Studio.
Hi Elco,
I’ll look into that; maybe I can find a windows 7 license/OS somewhere to run a virtual machine…(or borrow a friend’s pc!)
Although I wonder if you could do me (and perhaps others) a massive favour and make the latest compiled binary available to download from somewhere (maybe on github)?
Would we be able to download a binary to the aduino without having the full developer studio running on the host machine?
Cheers
John
I added a compiled binary for the Leonardo on GitHub.
Many thanks Elco!
I have successfully uploaded it to my Arduino Leonardo, which arrived yesterday. I can see what looks like valid output on the serial monitor (
D:Temperature sensor on pin 11 reconnected
D:Temperature sensor on pin 10 reconnected
) – there is no hardware connected yet…
All I need to do now is build the shield and get some hops 😉
ps: this page (http://nicholaskell.wordpress.com/2012/08/11/arduino-leonardo-upload-from-makefile/) was useful for how to upload from the command line;
I used the avrdude program which is bundled with the Arduino IDE – on my Mac in /Applications/Arduino.app/Contents/Resources/Java/hardware/tools/avr/bin
That is what is used by BrewPi as well. I call it from Python to let the Raspberry Pi upload a hex file to the Arduino.
ProgramArduinoFirstTime.py has to be run for the first upload. After that you can upload directly from the web interface.
Thanks Elco,
I have literally just found that out, as I downloaded and set up the BrewPI code on my RPI, it all seems to work great so far…
Think I will knock together a shield based on your current design, as I expect the new shield PCB will take several weeks to get made/shipped…will let you know how it goes.
John
Hi Elco –
Have you thought about using a service like this
http://www.seeedstudio.com/propagate/
It looks like a reasonable way to semi-commercialise
Cheers, Adam
Have you had anything further thoughts on porting this project to the Stellaris Launchpad? I’m guessing not based on the recent posts about the pcb shields. I just received my Launchpad in the mail and, time permitting, am hoping I can translate the code to it. The challenge is what it makes it fun for us DIY guys anyways…
On a simpler note, there is always the option of using Energia, a free IDE that uses the Arduino IDE. I believe they just added support for the new Launchpad. Also, they have recently released the Arduino Due which has a ARM Cortex M3 and is compatible with Uno shields (minus the fact that it requires 3.3V input instead of 5V). It will cost you an extra $15 an is about as hard to find as an R PI right now. Similarly, there is the Maple by Leaflabs.
Hi Anthony,
I have two Stellaris boards at home, but have not had the time to play with them. I do want to move away from 8-bit processors, so the project has room to grow in the future. The reason I am selling Arduino shields is that the current code base is AVR based, and this is the quickest way to get people involved.
For the next prototype I am looking at 32-bit platforms. One major requirement for me is hardware debugging. A few options are off the table immediately by this requirement, like the Arduino Due and Teensy 3.
The Stellaris has one downside: the IDE is locked to development boards from TI. So if I want to make an integrated board, instead of a shield, I cannot use the development tools from TI. (see http://processors.wiki.ti.com/index.php/Licensing_-_CCS#Free_Licenses)
Which platform to choose is up for discussion. I am looking at the new Galago boards, which do offer in-circuit debugging and use open source tools. So the question whether we should use the Launchpad comes down to: do we want shields or an integrated board.
Feel free to join the discussion on the forum (search ‘Galago’).
Elco
Elco,
I havn’t heard about the Galago before, i’ll be sure to take a closer look.
I may be reaching a bit out of my element here as I’ve only been playing around with MCs for about 6 months, but have you looked at using the Eclipse IDE + OpenCD + GDB for development? I’ve seen quite a few articles from Linux users trying to bypass the CCS limitation. I certainly am not at the comfort level to venture outside CCS or Keil’s uVision yet but others seem to be making progress.
If interested while waiting on the first Galago manufacturing run Hackaday has several posts on the topic. Follow the link from this article for detailed step-by-step tutorials on getting Eclipse set up for the Stellaris:
http://hackaday.com/2012/12/05/how-to-configure-eclipse-for-the-stellaris-launchpad/
I love your project! I have a 32 Hectolitre brewery for 18n years and had a brilliant monitor and control system based on a “building HVAC PLC”. It was great as a pid controller, but for brewing I added graphed values for yeast lag time and bioactivity (based on temp differences of ambient vs beer) as well as a programed diacetyl rest. By measuring the bioactivity you can tell when the cooling should not come on. at that sensitive time a bit of cooling can cause a cascading yeast flocculation. this can be 4 or 5 degrees over the setpoint.
Unfortunately my controller died and I want to build something.
thanks
-another james
Hi James,
That is some useful info. In my new prototype I am measuring the specific gravity, so I have a pretty good idea how active the yeast is. This next version should be an integrated controller with SG sensing and temperature control in one. Conditions like this can be programmed. The temperature fluctuations with my controller are very small, so the flocculation from cooling is probably less. It would be very interesting to see how it would work in your big brewery.
Elco
Great project!
Sure this is a silly question, but what is the purpose of having 2 SSRs? I imagine that just one is needed to control the compressor, is the other reserved for heating? if so how is the heating achieved?
Thanks!
Yes the other one is for heating. Heating can be done by a tube heater, reptile tank heater, fermwrap or simply the light bulb in the fridge (although power is limited).
how you calculate the remaning time for the exact temperature?
It is a very simple model now. Time the actuator is on, multiplied by a learning estimator. Each peak is detected to adjust the estimator. I have tried derivative based estimates, but due to the dead time in the system this did not work well.